Showing posts with label Hyper-V. Show all posts

Tuesday, 31 January 2023

Installing QNAP SnapAgent on Hyper-V Server 2019

In this blog, I will show how to install QNAP SnapAgent (QNAP's hardware VSS provider driver). The problem is that the installer refuses to install on Hyper-V Server (the free product).

Fixing "The product can only be installed on Windows Server 2008 R2 or above."


On the Hyper-V server, open regedit and navigate to: "Computer\HKEY_LOCAL_MACHINE\SOFTWARE\Microsoft\Windows NT\CurrentVersion"

Change the following key:

"InstallationType": change from "Server Core" to "Server".


Now install QNAP Snapshot agent. It should install fine. Don't forget to change the registry value back to what it was.


Source(s)

Wednesday, 14 July 2021

Live-Migrating a Hyper-V VM with TPM on Server Core

As part of our testing environment, we set up a Windows 11 Insider build in a VM and as per requirement, we enabled the virtual Trusted Platform Module (TPM) for that VM. I soon noticed that Cluster Aware Updating (CUA) stopped working on the failover cluster that hosted the VM.


More specifically, it turned out that the node that hosted the VM with the vTPM, could not be drained because the VM role could not be live-migrated to the other node.


Live migration of 'Virtual Machine Insider11' failed.

Virtual machine migration operation for 'Insider11' failed at migration destination 'HYPER-V25'. (Virtual machine ID E567C1C9-B323-4AED-B055-F9DCF98D0853)

The version of the device 'Microsoft Virtual TPM Device' of the virtual machine 'Insider11' is not compatible with device on physical computer 'HYPER-V25'. (Virtual machine ID E567C1C9-B323-4AED-B055-F9DCF98D0853)

The key protector for the virtual machine '' could not be unwrapped. HostGuardianService returned: One or more arguments are invalid (0x80070057) . Details are included in the HostGuardianService-Client event log. (Virtual machine ID )

The vTPM prevented live migration of the virtual machine. The solution lies in exporting the required certificates from the node's certificate store and importing them on the other node.

The issue I ran into with that solution was that on the free Hyper-V Server product, the certificate management console does not exist.


The solution is to do it in PowerShell. The certificates that need to be exported are in the local machine's certificate store in a folder called Shielded VM Local Certificates.

PS C:\> dir "cert:\LocalMachine\Shielded VM Local Certificates"


   PSParentPath: Microsoft.PowerShell.Security\Certificate::LocalMachine\Shielded VM Local Certificates

Thumbprint                                Subject
----------                                -------
A068364B6618C532067D93B3752ABEA4C86CF50D  CN=Shielded VM Encryption Certificate (UntrustedGuardian) (Hyper-V24)
883480C7627A4D63EC3E56E4F9A82A9F1EB1C4EB  CN=Shielded VM Signing Certificate (UntrustedGuardian) (Hyper-V24)


PS C:\>

I stored the certificates in a variable

PS C:\> $cert1 = Get-ChildItem -Path "cert:\LocalMachine\Shielded VM Local Certificates\A068364B6618C532067D93B3752ABEA4C86CF50D"
PS C:\> $cert2 = Get-ChildItem -Path "cert:\LocalMachine\Shielded VM Local Certificates\883480C7627A4D63EC3E56E4F9A82A9F1EB1C4EB"
PS C:\>

Next, I chose a password for the .pfx file,

PS C:\> $mypwd = ConvertTo-SecureString -String "1234" -Force -AsPlainText
PS C:\> 

 exported the first certificate and repeated the process for the second certificate.

PS C:\> $cert1 | Export-PfxCertificate -FilePath C:\cert1.pfx -Password $mypwd

    Directory: C:\

Mode                LastWriteTime         Length Name
----                -------------         ------ ----
-a----        7/14/2021   4:37 PM           2599 cert1.pfx

PS C:\>

Instead of using a password, I could protect the file by using -ProtectTo instead and set a User or group that is allowed to access the private key but I will not cover this possibility here.

Of course I could do this in one step by piping the output from Get-ChildItem into Export-PfxCertificate.

PS C:\> Get-ChildItem -Path "cert:\LocalMachine\Shielded VM Local Certificates\A068364B6618C532067D93B3752ABEA4C86CF50D" | Export-PfxCertificate -FilePath C:\cert1.pfx -Password $mypwd

    Directory: C:\

Mode                LastWriteTime         Length Name
----                -------------         ------ ----
-a----        7/14/2021   4:43 PM           2599 cert1.pfx

PS C:\>

The certificates were now exported as .pfx files on my c: drive and were moved to the other node.

PS C:\> dir c:\ *.pfx

    Directory: C:\

Mode                LastWriteTime         Length Name
----                -------------         ------ ----
-a----        7/14/2021   4:37 PM           2599 cert1.pfx
-a----        7/14/2021   4:37 PM           2599 cert2.pfx

PS C:\> 

On the other node, that is, on all nodes the VM potentially needs to be live-migrated to, I imported the certificate. This also needed to be done in PS as the certificate MMC was missing. The folder Shielded VM Local Certificates was also missing.

PS C:\> dir "cert:\LocalMachine\Shielded VM Local Certificates"
dir : Cannot find path '\LocalMachine\Shielded VM Local Certificates' because it does not exist.
At line:1 char:1
+ dir "cert:\LocalMachine\Shielded VM Local Certificates"
+ ~~~~~~~~~~~~~~~~~~~~~~~~~~~~~~~~~~~~~~~~~~~~~~~~~~~~~~~
    + CategoryInfo          : ObjectNotFound: (\LocalMachine\S...al Certificates:String) [Get-ChildItem], ItemNotFound
   Exception
    + FullyQualifiedErrorId : PathNotFound,Microsoft.PowerShell.Commands.GetChildItemCommand
PS C:\>

The folder did not exist, presumably because there never were any VMs with vTPM on that node. I needed to create the folder first.

PS C:\> mkdir "cert:\LocalMachine\Shielded VM Local Certificates"

Name : Shielded VM Local Certificates


PS C:\>

I was able to confirm that the folder existed and was empty.

PS C:\> dir "cert:\LocalMachine\Shielded VM Local Certificates" 
PS C:\> 

It was time to import the certificates from the other node. I needed the password that I had set before.

PS C:\> $mypwd = ConvertTo-SecureString -String "1234" -Force -AsPlainText
PS C:\> 

The import once again needed to be done for both certificates.

PS C:\> Import-PfxCertificate -FilePath D:\temp\cert1.pfx -CertStoreLocation "cert:\LocalMachine\Shielded VM Local Certificates" -Password $mypwd -Exportable


   PSParentPath: Microsoft.PowerShell.Security\Certificate::LocalMachine\Shielded VM Local Certificates

Thumbprint                                Subject
----------                                -------
A068364B6618C532067D93B3752ABEA4C86CF50D  CN=Shielded VM Encryption Certificate (UntrustedGuardian) (Hyper-V24)


PS C:\>

Note, that I chose to make the private key exportable by using the argument "-Exportable". This is not a requirement however.

Both certificates were imported. Note that the subject name contains the hostname of the node that hosts the VM with TPM

PS C:\> dir "cert:\LocalMachine\Shielded VM Local Certificates"

   PSParentPath: Microsoft.PowerShell.Security\Certificate::LocalMachine\Shielded VM Local Certificates
Thumbprint                                Subject
----------                                -------
A068364B6618C532067D93B3752ABEA4C86CF50D  CN=Shielded VM Encryption Certificate (UntrustedGuardian) (Hyper-V24)
883480C7627A4D63EC3E56E4F9A82A9F1EB1C4EB  CN=Shielded VM Signing Certificate (UntrustedGuardian) (Hyper-V24)

PS C:\> 

 That was it. The VM could now be live-migrated to the other node.

Sources:
Can I create a new folder/directory under Windows Certificates and import all my self signed CA certificates in it - Stack Overflow
How to manage certificate private keys on server 2016 Core : sysadmin (reddit.com)
Export-PfxCertificate (pki) | Microsoft Docs
Import-PfxCertificate (pki) | Microsoft Docs


Friday, 8 May 2015

Installation of DPM 2012 R2 on Windows Server 2012 R2 in Hyper-V


This will walk you through the installation of System Center Data Protection Manager 2012 R2 (DPM 2012 R2) on Windows Server 2012 R2 Standard in a Hyper-V virtual environment.

The environment:

Virtualization
  • On-premises Hyper-V using Microsoft Hyper-V Server 2012 R2

Storage Pool
The DPM will use a Direct Attached Storage (DAS) configuration with two physical HDDs for the storage pool.
  • 3 TB SATA HDD 
  • 8 TB SATA Shingled magnetic recording (SMR) archive HDD. 

File Photo Seagate ST8000 Archive HDD (4)


The HDDs will be made available to the DPM server as virtual hard disks (VHDX).

Database
The DPM's databse will be hosted on the locally installed Microsoft's SQL 2012 Standard with SP1.

Setting up the virtual machine

Before I can start, I need a virtual machine with Windows Server 2012 R2 installed and fully patched. I create a generation 2 vm with a max memory of 8 GB dynamically assigned vRAM.


Note that the storage pool disks will be added later.

Installing SQL Server 2012 SP1 Std x64

You could also use SQL 2014 as DPM's database. Support for SQL 2014 was added in one of the U
update rollups but for this installation I will use SQL 2012 with SP1.

Prerequisite .NET Framework 3.5 (1)
I added a virtual SCSI DVD-ROM drive and inserted the Windows Server 2012 R2 Std DVD. This installed .net.(2)


Microsoft Windows [Version 6.3.9600]
(c) 2013 Microsoft Corporation. All rights reserved.

C:\Windows\system32>DISM /Online /Enable-Feature /FeatureName:NetFx3 /All /Limit
Access /Source:d:\sources\sxs

Deployment Image Servicing and Management tool
Version: 6.3.9600.17031

Image Version: 6.3.9600.17031

Enabling feature(s)
[==========================100.0%==========================]
The operation completed successfully.

C:\Windows\system32>
 
 Several Windows Updates will be unlocked:
 
 
After the update installation, I ejected the virtual DVD and attached the virtual SQL installation DVD. I chose to install a new standalone installation.


In this screen I chose to install the Standard edition the way it comes with DPM 2012 R2. The product key is entered automatically. Express or Evaluation edition do not suffice.


The installer installed two SQL updates during the installation.


In the next screen I selected "feature installation" and all that is needed accroding to the requirements of DPM is:
  • Instance Features\Database Engine Services
  • Instance Features\Reporting Service - Native


And I decided to install the Management Tools
  • Shared Features\Management Tools - Basic
  • Shared Features\Management Tools - Complete

  
"Default Instance".

Now it is time to create one Domain account that will be used to run the SQL services. (3)

  • SQL Server Agent
  • SQL Server Database Engine
  • SQL Server Reporting Services
 

The database engine will use Latin1_General_CI_AS


Choose Windows authentication mode and choose one or more domain groups that will be the SQL administrators.

On the Reporting Services Native Mode prompt choose Install and configure.


The installation completed successfully.


Installing DPM 2012 R2

I inserted the DPM installation disc ISO into the virtual optical drive and started the DPM installation.

 In the prerequisites check, I entered the hostname of the virtual machine that was supposed to host both the SQL and the DPM and clicked Check and Install.


DPM setup proceeded to install basic missing Windows components and asked for a restart.


On second attempt, I was able to proceed.


It is time to enter the product key.


There are a few options some of them rather inconsequential (Customer Experience Improvement Program) like the installation path. The installation path is not where the backups will go,


Success.


Installing Updates

I wanted to install all the updates most above all SP2 for SQL 2012 and the Rollup 6 for DPM 2012 R2.

Another reboot is due.

 Readying the Storage Pool

On the hyper-v host, vhdx file were created on each physical storage pool disk
disk

3 TB disk > F:\vhds\dpm data 1.vhdx (~3 TB; dynamically expanding)
8 TB disk > G:\vhds\dpm data 2.vhdx (~8 TB; dynamically expanding)


In the VM, i brought the disks online and initialized them as GPT. Disk type basic.


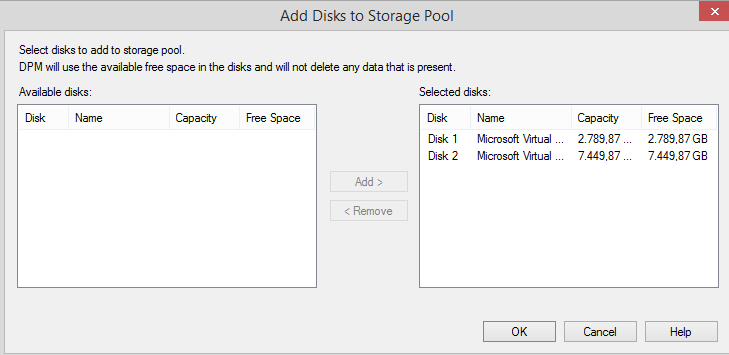
Using the DPM management console \ management tab, I added the disks to the storage pool:


The populated storage pool shows 10 TiB,

Q & A

Why did you not use pass through disks for the storage pool?
Firstly, because VHDX files are now a supported scenario and secondly because Microsoft has indicated that the pass through disk feature might be deprecated or and eventually removed in the future. Also, the virtual machine is supposed allow an easy live migration.

Sources
(1) Hardware and Software Requirements for Installing SQL Server 2012
(2) Deploy .NET Framework 3.5 by using Deployment Image Servicing and Management (DISM)
(3) Set up the SQL Server database for DPM
(4) http://www.seagate.com/files/www-content/product-content/hdd-fam/seagate-archive-hdd/_shared/images/archive-hdd-8tb-upper-hero-left-400x400.jpg

Monday, 29 September 2014

Error 347 when installing DPM 2012 R2 agent on Hyper-V 2008 R2

 "He who laughs last, probably made a backup"
The attempt to install the protection agent failed on a Hyper-V 2008 R2 target. The build number of the agent was 4.2.1254.0. The DPM version was Data protection Manager 2012 R2 with Rollup 3.

Install protection agent on Hyper-V06.nwtrader.local failed:
Error 347: An error occurred when the agent operation attempted to create the DPM Agent Coordinator service on Hyper-v06.nwtraders.local.
Error details: The application has failed to start because its side-by-side configuration is incorrect. Please see the application event log or use the command-line-sxstrace for more detail
Recommended action Verify that the Agent Coordinator service on Hyper-V06.nwtrader.local is responding, if it is present. Review the error details, take the appropriate action, and then retry the agent operation.


Cause
The DPM is unable to detect or install all the prerequisites for the protection agent and this resulted in a failed agent installation. Some of the prerequisites needed to be installed manually.

Note that this scenario is about these products:
  1. Microsoft Hyper-V Server 2008 R2 (6.1.7601)
    Not to be confused with Microsoft Windows Server 2008 R2 Core installation
  2. Microsoft Data Protection Manager 2012 R2 Rollup 3 (4.2.1254.0)


Solution
1)      Installing .NET Framework 2
  • Checking for .NET Framework 2
I retrieved the list of activated features using the DSIM tool in an elevated command prompt. The resulting output looked (abbreviated) looked like this:

 C:\Users\ben>DISM /Online /Get-Features

Deployment Image Servicing and Management tool

Version: 6.1.7600.16385
Image Version: 6.1.7601.18489

Features listing for package : Microsoft-Windows-ServerCore-Package~31bf3856ad36
4e35~amd64~~6.1.7601.17514

Feature Name : WindowsServerBackup
State : Disabled

Feature Name : MultipathIo
State : Disabled

Feature Name : Microsoft-Windows-RemoteFX-Host-Package
State : Disabled

Feature Name : Microsoft-Windows-RemoteFX-EmbeddedVideoCap-Setup-Package
State : Disabled
....
Feature Name : NetFx2-ServerCore
State : Disabled

The operation completed successfully.

C:\Users\ben>
 Note the missing .NET Framework 2
  • Installing the missing .net Framework 2 

C:\Users\ben>DISM /Online /Enable-Feature /FeatureName:NetFx2-ServerCore

Tool zur Abbildverwaltung für die Bereitstellung

Version: 6.1.7600.16385
Abbildversion: 6.1.7601.18489

Funktionen werden aktiviert

[==========================100.0%==========================]

Der Vorgang wurde erfolgreich beendet.

C:\Users\ben>
  • Confirm .NET Framework 2 installation
Using 
DISM /Online /Get-Features
 I found the following features enabled
  • ServerCore-EA-IME
  • Microsoft-Hyper-V
  • Microsoft-Hyper-V-Configuration
  • ServerCore-WOW64
  • NetFx2-ServerCore
NetFx2-ServerCore-WOW64 was not activated and not needed because the protection agent seemed to be a native x64 application, located in "c:\Program Files".

2)      Installing .NET Framework 4
I tried to install the agent but the .NET 4 was still missing

  •  Installing .NET Framework 4
I downloaded the installation package “Microsoft .NET Framework 4 (Standalone Installer) for Server Core” for Windows Server 2008 R2 SP1 Server Core or later at http://www.microsoft.com/en-us/download/details.aspx?id=22833

I made sure the requirements were met
  • Turn on WoW64: Start /w ocsetup ServerCore-WOW64
  • Turn on .NET 2.0 layer: Start /w ocsetup NetFx2-ServerCore
  • Turn on .NET 2.0 layer for WoW64: Start /w ocsetup NetFx2-ServerCore-WOW64
As I mentioned before, I skipped “.NET 2.0 layer for WoW64”

I started dotNetFx40_Full_x86_x64_SC.exe in an elevated command prompt


c) Verifying .NET Framework 4 installation

I checked for the presence of the .NET Framework 4 by displaying the list of installed applications like I would in the control panel if I had a GUI.
C:\Users\ben>wmic product get name

Name

Microsoft .NET Framework 4 Extended

Microsoft .NET Framework 4 Client Profile

C:\Users\ben>

3)      Then it was time to check for and install updates


I ignored some mscoree.dll errors during the update process. Presumably they are caused by my choice not to install the not needed WOW64 component of .NET Framework 2.


Note that all updates succeeded.

4)      Lastly, I rebooted

5)      I was then able to install the protection agent without any further issues.


I was able to verify the installation using wmic. I found that “Microsoft Visual C++ 2010  x64 Redistributable - 10.0.30319” had been installed along with the agent.
C:\Users\ben>wmic product get name

Name

Microsoft System Center 2012 R2 DPM Protection Agent

Microsoft Visual C++ 2010  x64 Redistributable - 10.0.30319

Microsoft .NET Framework 4 Extended

Microsoft .NET Framework 4 Client Profile

C:\Users\ben>