Thursday, 19 January 2023

1 - Ubuntu with LUKS: Backup and Restore with Veeam Part 1 - Installing Veeam agent for Linux

 First, let's get a few things out of the way.

  • This has nothing to do with virtual machines. This blog is about backing up a physical computer.
  • I'll be using Veeam Backup & Replication 11 (Build 11.0.1.1261) P20220302 and Ubuntu server 22.04.1 LTS. Veeam in this version does not officially support Ubuntu 22.10. This complicates things a little, as you will see, but it works.
  • I will focus on the Linux backup and bare-metal restore part. For all intents and purposes, it does not matter, if you use the standalone Veeam agent for Linux or the full VBR product. It does not matter, if you store the backup locally or on a remote repository. In this blog, I will use Veeam Backup & Replication Community Edition and store the backup in a remote repository.
  • There is some command line (shell) work required, but don't worry. It is mostly copy & paste.
  • You should already know how to work with Veeam in general. I will focus mostly on the parts the pertain to LUKS encryption and bare-metal restore.
  • I will use the server version of Ubuntu but it works the same way with the desktop version.

Part 1 - Installing Veeam agent for Linux


Saving the operating system disk device name in a variable


To find out the device name of the operating system disk, type df -h and look for the device that is the mount point for /boot and /boot/efi.

admin01@testlabubuntu01:~$ df -h  | grep boot
/dev/sda2                          2.0G  183M  1.7G  11% /boot
/dev/sda1                          1.1G  5.3M  1.1G   1% /boot/efi
admin01@testlabubuntu01:~$

In my case, the operating system disk is /dev/sda. Save the device name in a variable.

OSdisk='/dev/sda'

I will keep using this variable in all subsequent parts of this guide.

Understanding the disk layout


Understanding the disk layout is not strictly required. You may skip this part, if you are in a rush. If you went with the Ubuntu installer's default disk layout but you chose to check the checkbox for creating the LUKS encrypted container, this is what you end up with:

Ubuntu Setup: Encrypt the LVM group with LUKS

Ubuntu setup file system summary


sudo fdisk -l

Device       Start       End   Sectors   Size Type
/dev/sda1     2048   2203647   2201600     1G EFI System
/dev/sda2  2203648   6397951   4194304     2G Linux filesystem
/dev/sda3  6397952 266338270 259940319 123.9G Linux filesystem

admin01@testlabubuntu01:~$ lsblk -f $OSdisk
NAME FSTYPE FSVER LABEL UUID                                   FSAVAIL FSUSE% MOUNTPOINTS
sda
├─sda1
│    vfat   FAT32       A613-036C                                   1G     0% /boot/efi
├─sda2
│    ext4   1.0         4001732b-adc6-42fd-979c-4f7c117a0208      1.6G     9% /boot
└─sda3
     crypto 2           d8073181-5283-44b5-b4dc-6014b2e1a3c2
  └─dm_crypt-0
     LVM2_m LVM2        q0h4Ra-2nCU-G4fx-49uy-bhZ7-T5Og-2xc22Q
    └─ubuntu--vg-ubuntu--lv
       ext4   1.0         88b16848-6e7c-4a7c-ad48-05b9ae344bff       48G    16% /
admin01@testlabubuntu01:~$

In my case, /dev/sda is the operating system disk (and only disk in this computer). 

  • /dev/sda1 is the EFI system partition (ESP) and is mounted as /boot/efi. 
  • /dev/sda2 is the boot partiton and is mounted as /boot.
  • /dev/sda3 is where it's at. This partition is the encrypted LUKS container. Inside the container, there is the LVM with a volume group ubuntu--vg and inside there is a logical volume ubuntu--lv.
  • Also, note there are two mapper devices, dm_crypt-0 and ubuntu--vg-ubuntu--lv. dm_crypt-0 is the LUKS container and ubuntu--vg-ubuntu--lv is the opened LVM volume group which is mounted as /.

df -h
Filesystem                         Size  Used Avail Use% Mounted on
tmpfs                              387M  964K  386M   1% /run
/dev/mapper/ubuntu--vg-ubuntu--lv   61G  9.7G   48G  17% /
tmpfs                              1.9G     0  1.9G   0% /dev/shm
tmpfs                              5.0M     0  5.0M   0% /run/lock
/dev/sda2                          2.0G  1.1G  764M  59% /boot
/dev/sda1                          1.1G  5.3M  1.1G   1% /boot/efi
tmpfs                              387M  4.0K  387M   1% /run/user/1000

ls /dev/mapper/
control  dm_crypt-0  ubuntu--vg-ubuntu--lv

Note that for Ubuntu desktop, you have to check both the LVM and the encryption checkbox, as both are disabled by default if you want to end up with this setup.

Installing Veeam agent for Linux


Issues with installing Veeam agent for Linux on Ubuntu 22.04 or later host


The issue here is that Veeam right now, only supports Ubuntu up to version 21.10 and the agent cannot be installed from VBR console. Ubuntu 22.04 and higher will be supported only when Veeam 12 comes around. This is not because Veeam looks at the version string and refuses to install, it is because Ubuntu 22.04 does a few things differently under the hood, which causes installation to fail.

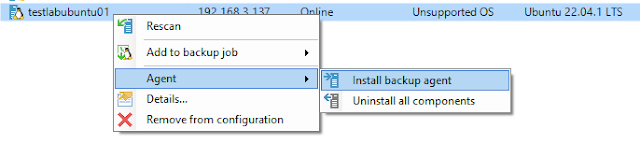
If you try to add a host running on Ubuntu 22.04 or higher to the VBR infrastructure, Veeam will report that that the OS is unsupported.

Veeam B&R adding Ubuntu 22.10 host to physical infrastructure

You can try to install the agent.

Veeam B&R installing agent on Ubuntu 22.10 host

But it will fail.


One reason for this is that Veeam needs the mlocate package for indexing and Ubuntu has removed this from Ubuntu 22.04.

It can be fixed by manually installing the agent.

Updating the system


Though not strictly required, I recommend you update everything and reboot.

sudo apt update
sudo apt upgrade
sudo apt reboot

From here on, I largely follow the official guide but like I wrote, installation will fail, so you need to change a few things.

Adding Veeam repository

Download the Veeam repository Debian Software Package. Veeam would have you sign up and create an account in order to get this file, but you can simply click on the link and you won't need to be logged in. You can find the latest version here without login. Or you can enter this command:

wget https://repository.veeam.com/backup/linux/agent/dpkg/debian/public/pool/veeam/v/veeam-release-deb/veeam-release-deb_1.0.8_amd64.deb

Add the Veeam repository.

sudo dpkg -i ./veeam-release* && apt-get update

You might get an error like this, but it can be safely ignored.

W: Problem unlinking the file /var/cache/apt/pkgcache.bin - RemoveCaches (13: Permission denied)

W: Problem unlinking the file /var/cache/apt/srcpkgcache.bin - RemoveCaches (13: Permission denied)

Optionally, you can verify that the repository is installed

admin01@testlabubuntu01:~$ grep veeam /etc/apt/sources.list /etc/apt/sources.list.d/*

/etc/apt/sources.list.d/veeam.list:deb [arch=amd64] http://repository.veeam.com/backup/linux/agent/dpkg/debian/public stable veeam

admin01@testlabubuntu01:~$

Update the repository

sudo apt update

Starting the Veeam agent for Linux installation


sudo apt-get install veeam

Note on UEFI Secure Boot: Since you chose LUKS encryption, it means you care to some extent about security, and you should also enable UEFI Secure Boot. Ideally, you do this before installing the agent because Veeam agent for Linux comes with a kernel module for snapshots and if Secure Boot is active, the kernel will be locked down and will not load the Veeam module unless it is signed. To work with Secure Boot, these requirements need to be met. Don't worry, this is taken care of mostly automatically, if Secure Boot is active before you install the agent.
  • A signed (pre) bootloader (shim) is installed
  • You have a Machine Owner Key (MOK) certificate
  • the MOK certificate is installed with shim
  • the Veeam kernel module is signed with the MOK certificate

Machine Owner Key (MOK) certificate enrollment


If Secure Boot is active at the time when the agent is installed and the MOK certificate is not enrolled already, you will be prompted to enroll the MOK certificate. This is a straightforward, mostly automated process. If you did not have Secure Boot active during the installation, but you decide to enable it later, you have to do this manually. See Veeam KB2260 Failed to load module [veeamsnap] as well as Ubuntu Blog: How to sign things for Secure Boot.

During Veeam agent for Linux installation you will see this screen.

Ubuntu Secure Boot MOK certificate enrollment info screen

Choose a password. This password will only be used temporarily, and can be discarded later.

Ubuntu Secure Boot MOK certificate enrollment password screen

Confirm the password.

Ubuntu Secure Boot MOK certificate enrollment password confirmation screen

When you are back on the prompt, the agent installation is finished. However, this does not take care of everything. You may notice, that the MOK certificate is still not enrolled but it is scheduled for enrollment.

mokutil --list-new

Because of this, the kernel module is available but cannot be loaded.

admin01@testlabubuntu01:~$ sudo modprobe veeamsnap
modprobe: ERROR: could not insert 'veeamsnap': Operation not permitted
admin01@testlabubuntu01:~$

Reboot and enroll the certificate.

sudo reboot

During boot, choose "Enroll MOK".

MOK certificate enrollment MOK management screen

Optionally, you can view the key before you enroll it. It is a self-signed certificate for signing kernel modules (code signing) that Ubuntu generated for you.
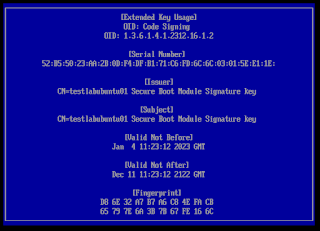
MOK certificate enrollment MOK key

Back on the [Enroll MOK] screen (see screenshot above), choose "Continue". Answer "Enroll the key(s)?" with yes.

MOK certificate enrollment confirmation

You may see this screen and may have to select the key (there should only be one key), but I did not get this screen every time during my testing.

MOK certificate enrollment view key

Enter the password that you chose during the installation of Veeam agent for Linux. This password, as I understand it, is needed only for the enrollment of the MOK certificate and is then not needed any longer.

MOK certificate enrollment password

Now choose reboot and boot into Ubuntu as usual.
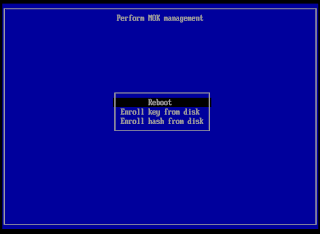
MOK certificate enrollment reboot

Optionally, you can now confirm that the key is enrolled. 

admin01@testlabubuntu01:~$ mokutil --list-enrolled | grep "Secure Boot Module Signature key"
        Issuer: CN=testlabubuntu01 Secure Boot Module Signature key
        Subject: CN=testlabubuntu01 Secure Boot Module Signature key
        Issuer: CN=testlabubuntu01 Secure Boot Module Signature key
        Subject: CN=testlabubuntu01 Secure Boot Module Signature key
admin01@testlabubuntu01:~$

You can see that this is a self-signed certificate, and that the veeamsnap module can now be loaded.

admin01@testlabubuntu01:~$ sudo modprobe veeamsnap
admin01@testlabubuntu01:~$ lsmod | grep veeamsnap
veeamsnap             200704  0
admin01@testlabubuntu01:~$

But don't forget to unload it because veeamsnap should only be loaded by Veeam while a backup job is running.

sudo rmmod veeamsnap

Optionally, you can now confirm that Veeam agent is installed.

admin01@testlabubuntu01:~$ whereis veeam
veeam: /usr/bin/veeam /usr/lib/veeam /etc/veeam /usr/share/veeam /usr/share/man/man8/veeam.8
admin01@testlabubuntu01:~$ apt list --installed | grep veeam

WARNING: apt does not have a stable CLI interface. Use with caution in scripts.

veeam-release-deb/stable,now 1.0.8 amd64 [installed]
veeam/stable,now 5.0.2.4567 amd64 [installed]
veeamsnap/stable,now 5.0.2.4567 all [installed,automatic]
admin01@testlabubuntu01:~$

Now proceed as you would with Veeam (either by setting up the agent and backup job locally or, in my case, by doing it from Veeam VBR console).

In my case, I have already added the Ubuntu host to a protection group (see above), and now I can rescan the host.

Veeam B&R rescan host

Now, VBR will detect the installed agent.

Veeam B&R protection group agent installed on Ubuntu 22.04

Veeam B&R console physical infrastructure agent installed on Ubuntu 22.04

Veeam B&R console Veeam agent for Linux version

In the next part, I will show how the backup is created.

Wednesday, 14 July 2021

Live-Migrating a Hyper-V VM with TPM on Server Core

As part of our testing environment, we set up a Windows 11 Insider build in a VM and as per requirement, we enabled the virtual Trusted Platform Module (TPM) for that VM. I soon noticed that Cluster Aware Updating (CUA) stopped working on the failover cluster that hosted the VM.


More specifically, it turned out that the node that hosted the VM with the vTPM, could not be drained because the VM role could not be live-migrated to the other node.


Live migration of 'Virtual Machine Insider11' failed.

Virtual machine migration operation for 'Insider11' failed at migration destination 'HYPER-V25'. (Virtual machine ID E567C1C9-B323-4AED-B055-F9DCF98D0853)

The version of the device 'Microsoft Virtual TPM Device' of the virtual machine 'Insider11' is not compatible with device on physical computer 'HYPER-V25'. (Virtual machine ID E567C1C9-B323-4AED-B055-F9DCF98D0853)

The key protector for the virtual machine '' could not be unwrapped. HostGuardianService returned: One or more arguments are invalid (0x80070057) . Details are included in the HostGuardianService-Client event log. (Virtual machine ID )

The vTPM prevented live migration of the virtual machine. The solution lies in exporting the required certificates from the node's certificate store and importing them on the other node.

The issue I ran into with that solution was that on the free Hyper-V Server product, the certificate management console does not exist.


The solution is to do it in PowerShell. The certificates that need to be exported are in the local machine's certificate store in a folder called Shielded VM Local Certificates.

PS C:\> dir "cert:\LocalMachine\Shielded VM Local Certificates"


   PSParentPath: Microsoft.PowerShell.Security\Certificate::LocalMachine\Shielded VM Local Certificates

Thumbprint                                Subject
----------                                -------
A068364B6618C532067D93B3752ABEA4C86CF50D  CN=Shielded VM Encryption Certificate (UntrustedGuardian) (Hyper-V24)
883480C7627A4D63EC3E56E4F9A82A9F1EB1C4EB  CN=Shielded VM Signing Certificate (UntrustedGuardian) (Hyper-V24)


PS C:\>

I stored the certificates in a variable

PS C:\> $cert1 = Get-ChildItem -Path "cert:\LocalMachine\Shielded VM Local Certificates\A068364B6618C532067D93B3752ABEA4C86CF50D"
PS C:\> $cert2 = Get-ChildItem -Path "cert:\LocalMachine\Shielded VM Local Certificates\883480C7627A4D63EC3E56E4F9A82A9F1EB1C4EB"
PS C:\>

Next, I chose a password for the .pfx file,

PS C:\> $mypwd = ConvertTo-SecureString -String "1234" -Force -AsPlainText
PS C:\> 

 exported the first certificate and repeated the process for the second certificate.

PS C:\> $cert1 | Export-PfxCertificate -FilePath C:\cert1.pfx -Password $mypwd

    Directory: C:\

Mode                LastWriteTime         Length Name
----                -------------         ------ ----
-a----        7/14/2021   4:37 PM           2599 cert1.pfx

PS C:\>

Instead of using a password, I could protect the file by using -ProtectTo instead and set a User or group that is allowed to access the private key but I will not cover this possibility here.

Of course I could do this in one step by piping the output from Get-ChildItem into Export-PfxCertificate.

PS C:\> Get-ChildItem -Path "cert:\LocalMachine\Shielded VM Local Certificates\A068364B6618C532067D93B3752ABEA4C86CF50D" | Export-PfxCertificate -FilePath C:\cert1.pfx -Password $mypwd

    Directory: C:\

Mode                LastWriteTime         Length Name
----                -------------         ------ ----
-a----        7/14/2021   4:43 PM           2599 cert1.pfx

PS C:\>

The certificates were now exported as .pfx files on my c: drive and were moved to the other node.

PS C:\> dir c:\ *.pfx

    Directory: C:\

Mode                LastWriteTime         Length Name
----                -------------         ------ ----
-a----        7/14/2021   4:37 PM           2599 cert1.pfx
-a----        7/14/2021   4:37 PM           2599 cert2.pfx

PS C:\> 

On the other node, that is, on all nodes the VM potentially needs to be live-migrated to, I imported the certificate. This also needed to be done in PS as the certificate MMC was missing. The folder Shielded VM Local Certificates was also missing.

PS C:\> dir "cert:\LocalMachine\Shielded VM Local Certificates"
dir : Cannot find path '\LocalMachine\Shielded VM Local Certificates' because it does not exist.
At line:1 char:1
+ dir "cert:\LocalMachine\Shielded VM Local Certificates"
+ ~~~~~~~~~~~~~~~~~~~~~~~~~~~~~~~~~~~~~~~~~~~~~~~~~~~~~~~
    + CategoryInfo          : ObjectNotFound: (\LocalMachine\S...al Certificates:String) [Get-ChildItem], ItemNotFound
   Exception
    + FullyQualifiedErrorId : PathNotFound,Microsoft.PowerShell.Commands.GetChildItemCommand
PS C:\>

The folder did not exist, presumably because there never were any VMs with vTPM on that node. I needed to create the folder first.

PS C:\> mkdir "cert:\LocalMachine\Shielded VM Local Certificates"

Name : Shielded VM Local Certificates


PS C:\>

I was able to confirm that the folder existed and was empty.

PS C:\> dir "cert:\LocalMachine\Shielded VM Local Certificates" 
PS C:\> 

It was time to import the certificates from the other node. I needed the password that I had set before.

PS C:\> $mypwd = ConvertTo-SecureString -String "1234" -Force -AsPlainText
PS C:\> 

The import once again needed to be done for both certificates.

PS C:\> Import-PfxCertificate -FilePath D:\temp\cert1.pfx -CertStoreLocation "cert:\LocalMachine\Shielded VM Local Certificates" -Password $mypwd -Exportable


   PSParentPath: Microsoft.PowerShell.Security\Certificate::LocalMachine\Shielded VM Local Certificates

Thumbprint                                Subject
----------                                -------
A068364B6618C532067D93B3752ABEA4C86CF50D  CN=Shielded VM Encryption Certificate (UntrustedGuardian) (Hyper-V24)


PS C:\>

Note, that I chose to make the private key exportable by using the argument "-Exportable". This is not a requirement however.

Both certificates were imported. Note that the subject name contains the hostname of the node that hosts the VM with TPM

PS C:\> dir "cert:\LocalMachine\Shielded VM Local Certificates"

   PSParentPath: Microsoft.PowerShell.Security\Certificate::LocalMachine\Shielded VM Local Certificates
Thumbprint                                Subject
----------                                -------
A068364B6618C532067D93B3752ABEA4C86CF50D  CN=Shielded VM Encryption Certificate (UntrustedGuardian) (Hyper-V24)
883480C7627A4D63EC3E56E4F9A82A9F1EB1C4EB  CN=Shielded VM Signing Certificate (UntrustedGuardian) (Hyper-V24)

PS C:\> 

 That was it. The VM could now be live-migrated to the other node.

Sources:
Can I create a new folder/directory under Windows Certificates and import all my self signed CA certificates in it - Stack Overflow
How to manage certificate private keys on server 2016 Core : sysadmin (reddit.com)
Export-PfxCertificate (pki) | Microsoft Docs
Import-PfxCertificate (pki) | Microsoft Docs


Saturday, 18 February 2017

Uninstalling Adobe Flash Player using Group Policy - Part 1

"Flash is a spaghetti-ball piece of technology  
that has lousy performance and really bad security problems."

Part 1 is about disabling Flash Player in Microsoft Edge using Group Policy.

What version of Flash player are your users running?


As I am writing this blog post, administrators once again find themselves in a situation that has existed since the introduction of Windows 8.
  1. Microsofts insists on integrating Adobe Flash Player in the Windows operating system.
  2. At the same time, security patches for Flash player that Adobe has already released, are occasionally withheld from Windows users.
The current situation is that Microsoft seems to have called off the February 2017 patch day altogether and Windows Users are stuck with an unpatched Flash Player.


In Microsoft Edge 38.14393.0.0 (Windows 10 14393.693) the Windows 10 Flash version number is 24,0,0,194 when it should be 24.0.0.221.

Check your Flash Player version here: http://www.adobe.com/software/flash/about/


Disabling Flash Player in Microsoft Edge using Group Policy


Create a new GPO and attach it to the OU that contains your Windows 10 users

Navigate to User Configuration \ Preferences \ Windows Settings \ Registry \

Right click on Registry. Choose New \ Registry Items

Configure the Properties:

Action: Update
Hive: HKEY_CURRENT_USER
Key Path:
SOFTWARE\Classes\Local Settings\Software\Microsoft\Windows\CurrentVersion\AppContainer\Storage\microsoft.microsoftedge_8wekyb3d8bbwe\MicrosoftEdge\Addons

The full path is
"HKEY_CURRENT_USER\SOFTWARE\Classes\Local Settings\Software\Microsoft\Windows\CurrentVersion\AppContainer\Storage\microsoft.microsoftedge_8wekyb3d8bbwe\MicrosoftEdge\Addons"

The key Addons may not exists and will be created later, when the GPO is applied.

Value Name: FlashPlayerEnabled
Value Type: Reg DWORD
Value Data: 00000000


Review the Group Policy:


Log on to the computer and check the Edge Settings:


Be aware that the user can always re-enable flash in their Edge settings, but the GPO will disable Flash at every login of the user.

This solution is therefore not yet perfect, but only part one of a bigger solution.

In the second part, I will show how to disable Flash in Internet Explorer.


Sunday, 5 February 2017

Perfect SSL Labs Score in 2017


"Even Paranoids Have Real Enemies"


I have written this guide show you how to achieve an A+ at Qualys' SSL Labs SSLServer Test, including full scores in all subcategories, in 2017.

I'll start with an installation of openSUSE Leap 42.1 on which all updates have been applied. The Apache webserver version is 2.4.16 and OpenSSL's version is 1.0.1i-fips. This is important because outdated versions do not support the features needed in this guide.

As I need OpenSSL 1.02, I decided to upgrade to openSUSE Leap 42.2 (Apache/2.4.23, OpenSSL 1.0.2j)

dev:~ # cat /etc/os-release  | grep PRETTY
PRETTY_NAME="openSUSE Leap 42.2"
dev:~ # apachectl -v
Server version: Apache/2.4.23 (Linux/SUSE)
Server built:   2017-01-19 09:35:11.000000000 +0000
dev:~ # openssl version
OpenSSL 1.0.2j-fips  26 Sep 2016
dev:~ #


Establish a baseline


There is room for improvement. In openSUSE's defense I will say that it probably doesn't come with this configuration out of the box. The server has most likely been tampered with, with no regard for https security in mind.

I will not edit the vhosts but instead the ssl-global.conf file.

Certificate


When you generate the CSR and obtain your certificate make sure it meets these standards:

Requirements for your server certificate

  • The key size is at least RSA 4096 bits or equivalent. EC (Elliptic Curve) with 384 bits will also work nicely.
  • Signature algorithm is SHA256withRSA
  • You need the CSR that you used to create the certificate
  • It is trusted, i.e. not self-signed
  • It is not expired, has not been revoked etc. :)

Requirements for the intermediate certificate

  • Same as above, except the key size may be as small as 2048 bits or equivalent
  • Obtain a copy of the intermediate certificate and store it locally on your webserver because you will later configure Apache to send the intermediate certificate to the client along with the server certificate.
  • If the intermediate certificate has an SHA1 signature algorithm, have your server certificate re-issued with a fully SHA256withRSA chain. This should be provided for free by your CA.

This is the bare minimum of what your vhost configuration file should contain:

/etc/apache2/vhosts.d/vhost-ssl.conf
<IfDefine SSL>
<IfDefine !NOSSL>
<VirtualHost _default_:443>


        DocumentRoot "/srv/www/htdocs"
        ServerName dev. Thehastingsfiles.local:443
        ServerAdmin administrator@thehastingsfiles
        ErrorLog /var/log/apache2/error_log
        TransferLog /var/log/apache2/access_log
 
        SSLEngine on

        SSLCertificateFile /usr/local/ssl/dev.crt
        SSLCertificateKeyFile /usr/local/ssl/dev.key
        SSLCertificateChainFile /usr/local/ssl/dev.INTERMEDIATE.crt


        CustomLog /var/log/apache2/ssl_request_log   ssl_combined
        DocumentRoot "/srv/www/htdocs"

</VirtualHost>

</IfDefine>
</IfDefine>

Protocol support

Basically ditching anything older than TLS 1.2 will give you 100 points in protocol support.

/etc/apache2/ssl-global.conf
SSLProtocol TLSv1.2


Cipher Strength and Key Exchange


/etc/apache2/ssl-global.conf
SSLCipherSuite "HIGH:!kRSA:!DHE-RSA-AES128-SHA256:!DHE-RSA-AES128-GCM-SHA256:!DHE-RSA-AES128-SHA:!DHE-RSA-CAMELLIA128-SHA:!ECDHE-RSA-AES128-SHA:!ECDHE-RSA-AES128-SHA256:!ECDHE-RSA-AES128-GCM-SHA256"


A+

For the A+, two more things are needed: Public Key Pinning (HPKP) and Strict Transport Security (HSTS)

Public Key Pinning (HPKP)

For this you are going to need your private key file (here cert.key) and the Certificate Signing request file (here cert.csr)

Find the pin using the private key:


dev:/etc/apache2 # openssl rsa -in /usr/local/ssl/cert.key -outform der -pubout | openssl dgst -sha256 -binary | openssl enc -base64

writing RSA key

********************************************

Find the backup pin using the CSR file:


dev:/etc/apache2 # openssl rsa -in /usr/local/ssl/cert.csr -outform der -pubout | openssl dgst -sha256 -binary | openssl enc -base64

unable to load Private Key

140386301204112:error:0906D06C:PEM routines:PEM_read_bio:no start line:pem_lib.c:707:Expecting: ANY PRIVATE KEY
********************************************

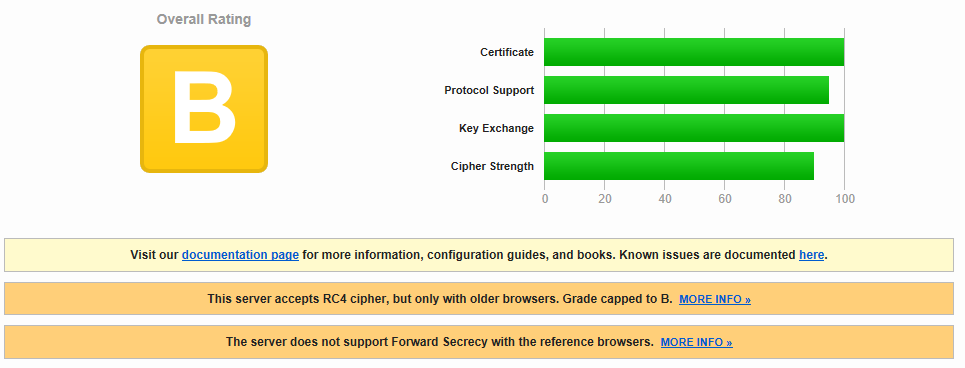
Find the intermediate cert pin on SSL Labs' website, where you can also see your own pin but not your backup pin:


Installing the pins:

ssl-global.conf

Header set Public-Key-Pins "pin-sha256=\"<insert pin>=\"; pin-sha256=\"<insert backup pin>=\"; pin-sha256=\"<insert intermediate cert pin>=\"; max-age=2592000; includeSubDomains"


Strict Transport Security (HSTS)

ssl-global.conf

Header always set Strict-Transport-Security "max-age=31536000; includeSubdomains; preload"

This is it! A+

The complete configuration file

This includes some features not mentioned above which will improve HTTPS performance and security and will show up in the SSLLabs report, but will not further improve your score. These include OCSP stapling and caching (session resumption).

ssl-global.conf

<IfDefine SSL>

<IfDefine !NOSSL>
<IfModule mod_ssl.c>

        #for Stapling Cache
        LoadModule socache_shmcb_module /usr/lib64/apache2/mod_socache_shmcb.so

        AddType application/x-x509-ca-cert .crt
        AddType application/x-pkcs7-crl    .crl

        #Session resumption (caching)
        Header edit Set-Cookie ^(.*)$ $1;HttpOnly;Secure

        #HTTP Public Key Pinning (HPKP)
        Header set Public-Key-Pins "pin-sha256=\"***=\"; pin-sha256=\"***=\"; pin-sha256=\"***=\"; max-age=2592000; includeSubDomains"

        Header always set X-Frame-Options SAMEORIGIN

        #HTTP Strict Transport Security (HSTS) with long duration

        Header always set Strict-Transport-Security "max-age=31536000; includeSubdomains; preload"

        Header always set X-Content-Type-Options nosniff

        <IfDefine SYSTEMD>
        SSLPassPhraseDialog exec:/usr/sbin/apache2-systemd-ask-pass
        </IfDefine>

        <IfDefine !SYSTEMD>
        SSLPassPhraseDialog  builtin
        </IfDefine>

        <IfModule mod_socache_dbm.c>
        SSLSessionCache         dbm:/var/lib/apache2/ssl_scache
        </IfModule>

        <IfModule mod_socache_shmcb.c>
        SSLSessionCache         shmcb:/var/lib/apache2/ssl_scache(512000)
        </IfModule>

        SSLSessionCacheTimeout  300

        SSLRandomSeed startup builtin
        SSLRandomSeed connect builtin

        SSLStaplingCache shmcb:/tmp/stapling_cache(128000)
        SSLUseStapling on
        SSLProtocol TLSv1.2

        SSLCipherSuite "HIGH:!kRSA:!DHE-RSA-AES128-SHA256:!DHE-RSA-AES128-GCM-SHA256:!DHE-RSA-AES128-SHA:!DHE-RSA-CAMELLIA128-SHA:!ECDHE-RSA-AES128-SHA:!ECDHE-RSA-AES128-SHA256:!ECDHE-RSA-AES128-GCM-SHA256"

        # ECDHE key exchange.
        SSLOpenSSLConfCmd Curves P-521:P-384

        SSLHonorCipherOrder on
        SSLCompression      off
        SSLOptions +StrictRequire

</IfModule>

</IfDefine>
</IfDefine>