If you have followed the previous parts, you will now have a backup of your Ubuntu computer, but you are not as ready as you could be to perform a restore to bare metal. In this part, I will show what else needs to be done to be able to perform a bare-metal restore. On the off chance that you have lost access to the Ubuntu computer before you were able to perform the steps I will show in this part, but you do have a backup, I will consider this possibility too during restore.
Take note of LUKS container properties, sector/cluster/block sizes
For reasons that I will explain in a later part, it now makes sense to write down a few things. The short explanation is that Veeam cannot restore the LUKS container. You will have to re-create it manually and for that, it helps to know what it looked like before the restore. This is important in particular because when Ubuntu installer creates a LUKS partition and container, depending on your physical disk, it defaults to a different sector size than what you get when you use cryptsetup or Veeam recovery UI to create a new container.
If you have not already done so, save the device name of your operating system disk in a variable. To find out the device name of the operating system disk, see part 1. In my case, the operating system disk is /dev/sda.
OSdisk='/dev/sda'
Partition table, logical/physical sector size of the OS disk
Also note the partition layout in general and the logical and physical sector size of the operating system disk in particular.
admin01@testlabubuntu01:~$ sudo gdisk -l $OSdisk
GPT fdisk (gdisk) version 1.0.8
...
Sector size (logical/physical): 512/4096 bytes
...
First usable sector is 34, last usable sector is 266338270
Partitions will be aligned on 2048-sector boundaries
...
Number Start (sector) End (sector) Size Code Name
1 2048 2203647 1.0 GiB EF00
2 2203648 6397951 2.0 GiB 8300
3 6397952 266336255 123.9 GiB 8300
admin01@testlabubuntu01:~$
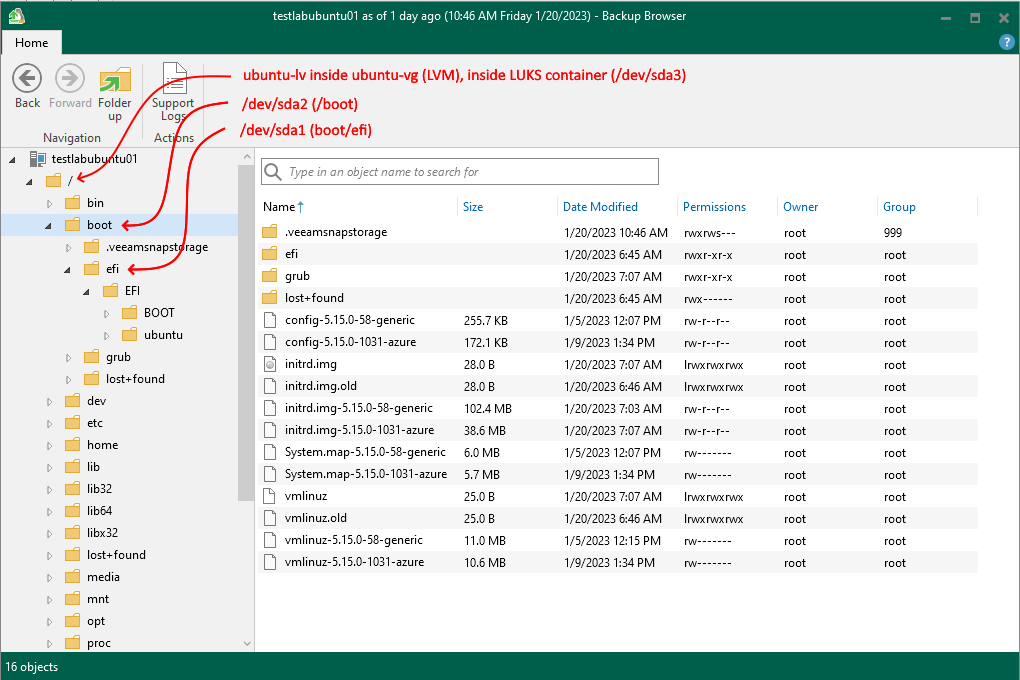
EFI system partiton (ESP), mounted as /boot/efi (here: /dev/sda1)
Though rather unimportant (unless you intend to restore to a disk with different logical/physical sector sizes), you can check the cluster size of the FAT32 formated EFI System partition (ESP, here: /dev/sda1). If you created your own Ubuntu live based recovery media, as I have shown previously, you can install mtools
sudo apt install mtools
And then use minfo.
admin01@testlabubuntu01:~$ sudo minfo -i ${OSdisk}1 | grep -E 'sector size|cluster size'
Hidden (2048) does not match sectors (63)
sector size: 512 bytes
cluster size: 8 sectors
admin01@testlabubuntu01:~$
The cluster size in bytes is sector size * cluster size. here: 512 * 8 = 4096. You can ignore the warning 'Hidden (2048) does not match sectors (63)'. It just means that the partition is properly aligned.
Bootloader (GRUB) partition, mounted as /boot (here: /dev/sda2)
As for the /boot partition (EXT4), here: /dev/sda2: Block size of /boot is also unimportant by the way, because it does not impact performance.
admin01@testlabubuntu01:~$ sudo tune2fs -l ${OSdisk}2 | grep "^Block size:"
Block size: 4096
admin01@testlabubuntu01:~$
As far as my testing goes, the sector/block size of the ESP and /boot partition will always be same after the restore as it was before the restore because Veeam restores them as they were before. To a fault actually, because when I tried to restore a backup from a 512e disk onto a 4Kn disk, this led to Veeam not properly restoring the ESP partition.
LUKS container mounted as /dev/mapper/dm_crypt-0 (here: /dev/sda3)
admin01@testlabubuntu01:~$ sudo cryptsetup luksDump ${OSdisk}3 | grep -E 'sector|UUID'
UUID: d8073181-5283-44b5-b4dc-6014b2e1a3c2
sector: 4096 [bytes]
admin01@testlabubuntu01:~$
Of interest here is the sector size of the LUKS container and the container/partition UUID, but you might want to take note of some other properties here as well.
admin01@testlabubuntu01:~$ sudo cryptsetup luksDump ${OSdisk}3 | grep Cipher
Cipher: aes-xts-plain64
Cipher key: 512 bits
admin01@testlabubuntu01:~$
LVM /dev/mapper/ubuntu--vg-ubuntu--lv mounted as /
Next, check the block size of the LVM mapper device. This should be the same as the LUKS container sector size.
admin01@testlabubuntu01:~$ sudo blockdev --getss /dev/mapper/ubuntu--vg-ubuntu--lv
4096
admin01@testlabubuntu01:~$
Or you can use tune2fs.
admin01@testlabubuntu01:~$ sudo tune2fs -l /dev/mapper/ubuntu--vg-ubuntu--lv | grep "^Block size:"
Block size: 4096
admin01@testlabubuntu01:~$
You can also check with stat.
admin01@testlabubuntu01:~$ sudo stat -f / | grep 'Block size'
Block size: 4096 Fundamental block size: 4096
admin01@testlabubuntu01:~$
Documenting LUKS container properties, sector/cluster/block sizes
I recommend you save the container properties on the disk. This way, it will be backed up and you will have it available during restore. Copy & paste the entire paragraph below and paste it to the shell in one go.
d=${HOME}'/RestoreInfo'
mkdir $d
sudo gdisk -l $OSdisk > ${d}/gdisk
sudo minfo -i ${OSdisk}1 > ${d}/minfo-partition-1
sudo tune2fs -l ${OSdisk}2 > ${d}/tune2fs-partition-2
sudo blockdev --getss \
/dev/mapper/ubuntu--vg-ubuntu--lv > \
${d}/blockdev-ubuntu--vg-ubuntu--lv
sudo cryptsetup luksDump ${OSdisk}3 > ${d}/luksDump
sudo tune2fs -l \
sudo tune2fs -l \
/dev/mapper/ubuntu--vg-ubuntu--lv > \
${d}/tune2fs-ubuntu--vg-ubuntu--lv
sudo stat -f / > ${d}/stat-root-file-system
You should now have several files which contain all the above information. These are stored in a directory named RestoreInfo in your home directory.
admin01@testlabubuntu01:~$ echo $d
/home/admin01/RestoreInfo
admin01@testlabubuntu01:~$ ls $dblockdev-ubuntu--vg-ubuntu--lv stat-root-file-system
gdisk tune2fs-partition-2
luksDump tune2fs-ubuntu--vg-ubuntu--lv
minfo-partition-1
admin01@testlabubuntu01:~$
But I don't have access to the Ubuntu computer anymore, because it was hacked/I wiped it just to see if I could successfully restore it/it was abducted by aliens! What can I do?
The above information about partition layout and LUKS container properties helps during bare-metal restore, but it is not strictly necessary. It allows you to verify that the partition layout and LUKS container were re-created exactly as they were before the restore. If you don't have that information, you will still be able to successfully restore the system.
Final preparation
Now is a good time to ensure that
- you have created bootable media,
or you have access to the recovery media files even if the Ubuntu host is offline and you are able to create as needed, bootable media from the ISO files (for instance with Rufus)
or you have verified that you can successfully create a recovery media using an Ubuntu live system - the recovery media can successfully boot on the Ubuntu host
- the recovery media can access the host's disks
- the recovery media can access the backup location (in my case, this is a remote repository)
- you have knowledge of the
- operating system disk physical properties
- partition layout
- file system sector/block sizes
- LUKS container properties
The following is only relevant if the backup will be stored in a repository and you will access it through VBR server. Ensure that
- the recovery media has network connectivity and can reach the VBR server
- you have configured access for a user that will be used to access the repository and restore from backup
System administrators who use Veeam mainly for backing up and restoring virtual machines might have to have set up repository access. To set up repository access for a user, in VBR console go to Backup Infrastructure, right click on the repository and choose "Access permissions ...".


Note that you do not need to set up encryption here. The encryption setting in the screenshot above, only pertains to scenarios in which an agent targets a backup repository but is not configured through the VBR server. A scenario that in my opinion does not make sense, because even if the agent works in standalone mode, I still would like to configure the job through VBR.
If all that is there, you should be able to successfully restore the system to bare-metal which is what happens in the next part.
")


")
")