Monday, 23 January 2023

4 - Ubuntu with LUKS: Backup and Restore with Veeam Part 4 - Getting ready for bare-metal restore

If you have followed the previous parts, you will now have a backup of your Ubuntu computer, but you are not as ready as you could be to perform a restore to bare metal. In this part, I will show what else needs to be done to be able to perform a bare-metal restore. On the off chance that you have lost access to the Ubuntu computer before you were able to perform the steps I will show in this part, but you do have a backup, I will consider this possibility too during restore.

Take note of LUKS container properties, sector/cluster/block sizes


For reasons that I will explain in a later part, it now makes sense to write down a few things. The short explanation is that Veeam cannot restore the LUKS container. You will have to re-create it manually and for that, it helps to know what it looked like before the restore. This is important in particular because when Ubuntu installer creates a LUKS partition and container, depending on your physical disk, it defaults to a different sector size than what you get when you use cryptsetup or Veeam recovery UI to create a new container.

If you have not already done so, save the device name of your operating system disk in a variable. To find out the device name of the operating system disk, see part 1. In my case, the operating system disk is /dev/sda.

OSdisk='/dev/sda'

Partition table, logical/physical sector size of the OS disk


Also note the partition layout in general and the logical and physical sector size of the operating system disk in particular.

admin01@testlabubuntu01:~$ sudo gdisk -l $OSdisk
GPT fdisk (gdisk) version 1.0.8
...
Sector size (logical/physical): 512/4096 bytes
...
First usable sector is 34, last usable sector is 266338270
Partitions will be aligned on 2048-sector boundaries
...
Number  Start (sector)    End (sector)  Size       Code  Name
   1            2048         2203647   1.0 GiB     EF00
   2         2203648         6397951   2.0 GiB     8300
   3         6397952       266336255   123.9 GiB   8300
admin01@testlabubuntu01:~$


EFI system partiton (ESP), mounted as /boot/efi (here: /dev/sda1)


Though rather unimportant (unless you intend to restore to a disk with different logical/physical sector sizes), you can check the cluster size of the FAT32 formated EFI System partition (ESP, here: /dev/sda1). If you created your own Ubuntu live based recovery media, as I have shown previously, you can install mtools

sudo apt install mtools

And then use minfo.

admin01@testlabubuntu01:~$ sudo minfo -i ${OSdisk}1 | grep -E 'sector size|cluster size'
Hidden (2048) does not match sectors (63)
sector size: 512 bytes
cluster size: 8 sectors
admin01@testlabubuntu01:~$

The cluster size in bytes is sector size * cluster size. here: 512 * 8 = 4096. You can ignore the warning 'Hidden (2048) does not match sectors (63)'. It just means that the partition is properly aligned.

Bootloader (GRUB) partition, mounted as /boot (here: /dev/sda2)


As for the /boot partition (EXT4), here: /dev/sda2: Block size of /boot is also unimportant by the way, because it does not impact performance.

admin01@testlabubuntu01:~$ sudo tune2fs -l ${OSdisk}2 | grep "^Block size:"
Block size:               4096
admin01@testlabubuntu01:~$

As far as my testing goes, the sector/block size of the ESP and /boot partition will always be same after the restore as it was before the restore because Veeam restores them as they were before. To a fault actually, because when I tried to restore a backup from a 512e disk onto a 4Kn disk, this led to Veeam not properly restoring the ESP partition.

LUKS container mounted as /dev/mapper/dm_crypt-0 (here: /dev/sda3)


admin01@testlabubuntu01:~$ sudo cryptsetup luksDump ${OSdisk}3 | grep -E 'sector|UUID'
UUID:           d8073181-5283-44b5-b4dc-6014b2e1a3c2
        sector: 4096 [bytes]
admin01@testlabubuntu01:~$

Of interest here is the sector size of the LUKS container and the container/partition UUID, but you might want to take note of some other properties here as well.

admin01@testlabubuntu01:~$ sudo cryptsetup luksDump ${OSdisk}3 | grep Cipher
        Cipher:     aes-xts-plain64
        Cipher key: 512 bits
admin01@testlabubuntu01:~$

LVM /dev/mapper/ubuntu--vg-ubuntu--lv mounted as /


Next, check the block size of the LVM mapper device. This should be the same as the LUKS container sector size.

admin01@testlabubuntu01:~$ sudo blockdev --getss /dev/mapper/ubuntu--vg-ubuntu--lv
4096
admin01@testlabubuntu01:~$

Or you can use tune2fs.

admin01@testlabubuntu01:~$ sudo tune2fs -l /dev/mapper/ubuntu--vg-ubuntu--lv | grep "^Block size:"
Block size:               4096
admin01@testlabubuntu01:~$

You can also check with stat.

admin01@testlabubuntu01:~$ sudo stat -f / | grep 'Block size'
Block size: 4096       Fundamental block size: 4096
admin01@testlabubuntu01:~$

Documenting LUKS container properties, sector/cluster/block sizes


I recommend you save the container properties on the disk. This way, it will be backed up and you will have it available during restore. Copy & paste the entire paragraph below and paste it to the shell in one go.

d=${HOME}'/RestoreInfo'
mkdir $d
sudo gdisk -l $OSdisk > ${d}/gdisk
sudo minfo -i ${OSdisk}1 > ${d}/minfo-partition-1
sudo tune2fs -l ${OSdisk}2 > ${d}/tune2fs-partition-2
sudo blockdev --getss \
    /dev/mapper/ubuntu--vg-ubuntu--lv > \
    ${d}/blockdev-ubuntu--vg-ubuntu--lv
sudo cryptsetup luksDump ${OSdisk}3 > ${d}/luksDump  
sudo tune2fs -l \
    /dev/mapper/ubuntu--vg-ubuntu--lv > \
    ${d}/tune2fs-ubuntu--vg-ubuntu--lv
sudo stat -f / > ${d}/stat-root-file-system

You should now have several files which contain all the above information. These are stored in a directory named RestoreInfo in your home directory.

admin01@testlabubuntu01:~$ echo $d
/home/admin01/RestoreInfo
admin01@testlabubuntu01:~$ ls $d
blockdev-ubuntu--vg-ubuntu--lv  stat-root-file-system
gdisk                           tune2fs-partition-2
luksDump                        tune2fs-ubuntu--vg-ubuntu--lv
minfo-partition-1
admin01@testlabubuntu01:~$

But I don't have access to the Ubuntu computer anymore, because it was hacked/I wiped it just to see if I could successfully restore it/it was abducted by aliens! What can I do?


The above information about partition layout and LUKS container properties helps during bare-metal restore, but it is not strictly necessary. It allows you to verify that the partition layout and LUKS container were re-created exactly as they were before the restore. If you don't have that information, you will still be able to successfully restore the system.

Final preparation


Now is a good time to ensure that
  • you have created bootable media,
    or you have access to the recovery media files even if the Ubuntu host is offline and you are able to create as needed, bootable media from the ISO files (for instance with Rufus)
    or you have verified that you can successfully create a recovery media using an Ubuntu live system
  • the recovery media can successfully boot on the Ubuntu host
  • the recovery media can access the host's disks
  • the recovery media can access the backup location (in my case, this is a remote repository)
  • you have knowledge of the 
    • operating system disk physical properties
    • partition layout 
    • file system sector/block sizes
    • LUKS container properties
The following is only relevant if the backup will be stored in a repository and you will access it through VBR server. Ensure that
  • the recovery media has network connectivity and can reach the VBR server
  • you have configured access for a user that will be used to access the repository and restore from backup
System administrators who use Veeam mainly for backing up and restoring virtual machines might have to have set up repository access. To set up repository access for a user, in VBR console go to Backup Infrastructure, right click on the repository and choose "Access permissions ...".


Now choose "Allow the following accounts or groups only" and add a user or group. It can also be an Active Directory user or group. Make sure that this user can access the repository through Veeam recovery media.

Veeam B&R console backup repository access permissions

Note that you do not need to set up encryption here. The encryption setting in the screenshot above, only pertains to scenarios in which an agent targets a backup repository but is not configured through the VBR server. A scenario that in my opinion does not make sense, because even if the agent works in standalone mode, I still would like to configure the job through VBR.

If all that is there, you should be able to successfully restore the system to bare-metal which is what happens in the next part.

3 - Ubuntu with LUKS: Backup and Restore with Veeam Part 3 - Creating the Veeam Recovery media

As you would like to be able to do a bare metal restore, you now need to make sure that you have the recovery media ready when you need it. I recommend that you create both the generic and the custom media and then store it somewhere off of the server, so you can create a bootable thumb drive when you need it.

Why this does not work from VBR console


If you try to do this from VBR console, like you would with other hosts (here a Windows computer), 

Veeam B&R console create recovery media (Windows host)


you will see that, if the host ist Ubuntu 22.04, this option is missing.

Veeam B&R console Ubuntu 22.04 host recovery media creation option missing


Creating the generic recovery media


admin01@testlabubuntu01:~$ sudo veeamconfig downloadiso --output /home/admin01
Downloading Veeam Recovery Media...
Veeam Recovery Media has been downloaded successfully.
admin01@testlabubuntu01:~$


But I don't have access to the Ubuntu computer anymore, because it was hacked/the hard disk died/it went up in flames! What can I do?

You can simply download it from Veeam's servers. I chose to download it on the Ubuntu host, as this will allow me create a custom recovery media later.


Creating the custom recovery media


Depending on the hardware you use, you may need to create a custom recovery media which, in my understanding includes hardware drivers particular to your hardware. You will need to test for yourself if the generic media is enough to do a bare metal recovery on your hardware. Either way, I recommend that you have both the generic and the custom recovery media ready when you need it.

Now, there will be a few issues.

admin01@testlabubuntu01:~$ sudo veeamconfig patchiso \
        --efi \
        --input /home/admin01/veeam-recovery-amd64-5.0.0.iso \
        --output /home/admin01/veeam-recovery-amd64-5.0.0-custom.iso
Creating custom Veeam Recovery Media...
Failed to patch the Recovery Media: 'xorriso' not found.
admin01@testlabubuntu01:~$

Firstly, this fails right away, because the xorriso package is missing. Install it with

sudo apt install xorriso

Secondly, if you try this again with xorriso installed, it will still fail.

admin01@testlabubuntu01:~$ sudo veeamconfig patchiso \
        --efi \
        --input /home/admin01/veeam-recovery-amd64-5.0.0.iso \
        --output /home/admin01/veeam-recovery-amd64-5.0.0-custom.iso
Creating custom Veeam Recovery Media...
FATAL ERROR: write_file: failed to create file /tmp/veeam/livecd-{d20e051c-6e0b-4ca8-a269-a9c0f9a7be70}/rootfs/usr/lib/modules/4.19.0-18-amd64/kernel/drivers/hid/hid-roccat.ko, because Too many open files
Exit code: [1]
Failed to execute script command unsquashfs -no-progress -dest /tmp/veeam/livecd-{d20e051c-6e0b-4ca8-a269-a9c0f9a7be70}/rootfs /tmp/veeam/livecd-{d20e051c-6e0b-4ca8-a269-a9c0f9a7be70}/patched_iso/filesystem.squashfs
Failed to unpack squashfs image [/tmp/veeam/livecd-{d20e051c-6e0b-4ca8-a269-a9c0f9a7be70}/patched_iso/filesystem.squashfs] to directory [/tmp/veeam/livecd-{d20e051c-6e0b-4ca8-a269-a9c0f9a7be70}/rootfs].
admin01@testlabubuntu01:~$

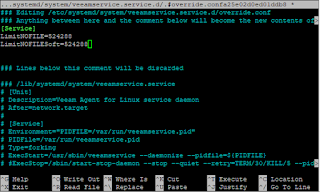
The solution to this is to edit the service configuration.

sudo systemctl edit veeamservice.service

Starting at line 3, add

[Service] LimitNOFILE=524288 LimitNOFILESoft=524288

Like so, and save the file.
systemd Veeam service settings


Now reload systemctl/systemd and the Veeam service. 

sudo systemctl daemon-reload
sudo service veeamservice restart

This time, it should work.

admin01@testlabubuntu01:~$ sudo veeamconfig patchiso \
        --efi \
        --input /home/admin01/veeam-recovery-amd64-5.0.0.iso \
        --output /home/admin01/veeam-recovery-amd64-5.0.0-custom.iso
Creating custom Veeam Recovery Media...
Custom Veeam Recovery Media has been created successfully

You should now have two ISO files. For obvious reasons, do not store these files on the same host that will be restored with the recovery media.

admin01@testlabubuntu01:~$ ls *recovery*
veeam-recovery-amd64-5.0.0-custom.iso  veeam-recovery-amd64-5.0.0.iso
admin01@testlabubuntu01:~$

Note that the custom media does not boot when Secure Boot is enabled.

But I don't have access to the Ubuntu computer anymore, because it was hacked/doesn't boot anymore/was swallowed by a sinkhole. What can I do?


You can test if the generic media works properly on your system. In that case, you don't need the custom media. If you do the custom media, because the generic media does not work with your hardware, you could

  • install a fresh Ubuntu installation
  • install all the drivers/modules you need
  • install Veeam agent for Linux
  • create the custom media
  • then wipe everything an restore the backup
However, instead I recommend that you proceed with using an Ubuntu live system as your recovery media.

Using a bootable Ubuntu live system as a Veeam recovery media


There are a few options here. You could
  • boot up a real live system and create the recovery media as needed, at the time of the restore. This is the option that I will show.
  • use a live system on a thumb drive with persistent partition. That way, you can prepare the Ubuntu live recovery media beforehand.
  • do a regular Ubuntu installation but on a thumbdrive and use that as recovery media
In this case, I will show how you can turn Ubuntu Desktop 22.10 live into a working Veeam recovery media.

Boot into Ubuntu live.

Enabling SSH connections into the live system


This part is optional, but I like to SSH into it. Also, the Veeam recovery media also allows you to SSH into it, so I would like to have this functionality here too.

You need to set a password for the "ubuntu" user that is present on Ubuntu live systems but given that in a real world scenario, I would be in a rush to the get the data restored and the computer up and running again, I do not want so deal with complex passwords.

Removing complex password requirements


This may be bad advice and it is also optional of course.. On the desktop of the Ubuntu live system, open the terminal app.

sudo nano /etc/pam.d/common-password

In this file, there will be three lines like this:

#password       requisite                       pam_pwquality.so retry=3
#password       [success=2 default=ignore]      pam_unix.so obscure use_authtok try_first_pass yescrypt
#password       sufficient                      pam_sss.so use_authtok

Add '#' to make turn them into comments. Now add a new line below and save the file.

password        [success=1 default=ignore]      pam_unix.so minlen=1 sha512


Now you can change the password for the ubuntu user

passwd ubuntu

Next, install the SSH package. Do not try to upgrade everything with sudo apt upgrade. You may run out of /tmp space.

sudo apt update
sudo apt install ssh

Now you can find out the live system's IP address and connect remotely via SSH.

admin01@testlabubuntu01:~$ ip a | grep 'inet '
    inet 127.0.0.1/8 scope host lo
    inet 192.168.3.135/24 metric 100 brd 192.168.3.255 scope global dynamic eth0
admin01@testlabubuntu01:~$

 In case of my test lab, the IPv4 is 192.168.3.135.

Installing Veeam agent for Linux


This is similar, but not identical to the installation shown in the previous part.

Download the Veeam repository Debian Software Package.

wget https://repository.veeam.com/backup/linux/agent/dpkg/debian/public/pool/veeam/v/veeam-release-deb/veeam-release-deb_1.0.8_amd64.deb

Add the Veeam repository.

ubuntu@ubuntu:~$ sudo dpkg -i ./veeam-release*
sudo apt update

This time, install the agent without veeamsnap module, as you will not create snapshots (or backups for that matter) in the recovery system.

sudo apt update
sudo apt install veeam-nosnap

This will lead to an error because the libfuse2 package is missing.

The following packages have unmet dependencies:
 veeam-nosnap : Depends: libfuse2 but it is not installable
E: Unable to correct problems, you have held broken packages.

To fix this, type

sudo add-apt-repository universe
sudo apt update

Now, it should install without errors.

sudo apt install veeam-nosnap

Optionally, you can now confirm that Veeam agent is installed.

ubuntu@ubuntu:~$ whereis veeam
veeam: /usr/bin/veeam /usr/lib/veeam /etc/veeam /usr/share/veeam /usr/share/man/man8/veeam.8
ubuntu@ubuntu:~$ sudo apt list --installed | grep veeam

WARNING: apt does not have a stable CLI interface. Use with caution in scripts.

veeam-nosnap/stable,now 5.0.2.4567 amd64 [installed]
veeam-release-deb/stable,now 1.0.8 amd64 [installed]
ubuntu@ubuntu:~$

Installing the agent does not make the live system a Veeam recovery media. Although Veeam agent for Linux is able to restore volumes, it does not create volumes that do not already exist. Only the recovery UI will create new partitions on an empty disk.

Enabling Veeam recovery UI


Enable recovery UI editing /etc/veeam/veeam.ini.

sudo nano /etc/veeam/veeam.ini

At the end of the file, add:

[recoveryui]
 enableOnLiveSystem = 1

Restart the veeamservice to apply changes.

sudo service veeamservice restart

Confirm that this worked, by starting the Recovery UI.

sudo veeamconfig recoveryui

It should look like this.


Now you have a generic recovery media, a custom recovery media and you can make an Ubuntu live based recovery media if needed, but before you proceed to bare-metal restore, there are still a few things to do.

In the next part, I will show what needs to be done to be ready for the bare-metal restore.

2 - Ubuntu with LUKS: Backup and Restore with Veeam Part 2 - Backing up Ubuntu (with LUKS)


Creating a backup job


In this part, I will show how to back up the entire operating system disk, including all of its partitions and volumes. Like I mentioned, I will not go through every single step that needs to be done here. I will focus on the part that is important when dealing with Ubuntu and LUKS encryption.

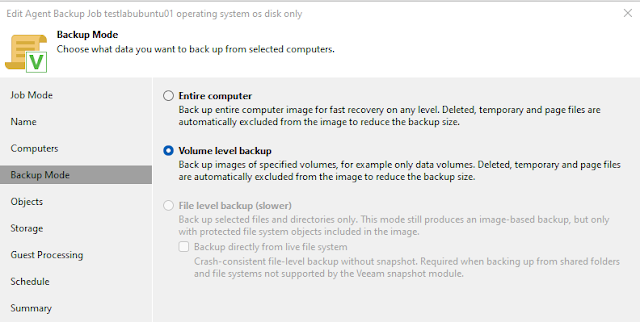
Choose backup mode Volume level backup.

Veeam B&R console backup job settings (backup mode)

In the Objects screen, add 
  • /dev/mapper/dm_crypt-0 as a device
  • /dev/sda as a device. 
/dev/sda here is the operating system disk and it might be called differently on your hardware. If it is an NVMe SSD, it would be /dev/nvme0n1. If you are unsure, type df -h and look for the device that is the mount point for /boot and /boot/efi.

admin01@testlabubuntu01:~$ df -h  | grep boot
/dev/sda2                          2.0G  183M  1.7G  11% /boot
/dev/sda1                          1.1G  5.3M  1.1G   1% /boot/efi
admin01@testlabubuntu01:~$

Veeam B&R console backup job settings (objects)

A few notes on this, (which you may skip if you are in a hurry): 

The reason for this is, if you only select /dev/sda, then /dev/sda3 (and the Ubuntu installation within) will not be backed up because Veeam does not support and does not "see" LUKS containers.

You could also choose "Entire Computer" as backup mode, but you might have good reasons as to why you don't want to do that. You might have separate backup jobs for the operating system and for data on other disks. Or you might have file systems like ZFS, that are not compatible with Veeam's volume snapshot mode.

If you have only one disk, backing up /dev/mapper/dm_crypt-0 as a device and /dev/sda as a device will lead to the same result as backing up "Entire computer".

You could also choose to backup /dev/mapper/ubuntu--vg-ubuntu--lv as LVM instead of /dev/mapper/dm_crypt-0 as a device but restore will be slightly different and I found it more straightforward to back up dm_crypt-0.

Another consideration for the backup job settings is encryption. Note, that the above settings will lead to Veeam backing up the data as plain text. That's okay because we can encrypt the backup too. Since you probably chose LUKS encryption during Ubuntu setup for a reason, it makes little sense to store the backup in plain text. I recommend you enable encryption in the backup job settings.

Veeam B&R console backup settings encryption


Now run the backup job as usual.


There are a few oddities here, that come from the fact that Veeam does not support LUKS containers. None of this will prevent you from doing the restore, however. 
  • Firstly, the total size (here: 189 GB) is wrong. The entire disk is only 127 GB large. This is because Veeam adds up the disk's total size (here: 127 GB) and the LVM volume group's size which was created by Ubuntu installer with 61 GB size.
  • Secondly, it backed up ubuntu-vg even though we configured it to back up dm_crypt-0


How do I know this worked?


That is: How do I know that everything has been backed up?

The first hint can be seen in the backup job logs.

1/20/2023 10:48:50 AM :: Backed up ubuntu-vg 11.1 GB at 309.3 MB/s  
1/20/2023 10:49:27 AM :: Backed up sda 3.1 GB at 911.9 MB/s  

You should be able to see that only a small amount of data (ESP, boot partitions) was backed up as the physical disk device (here sda). Then there should be line that states that ubuntu-vg was backed up that should in size, roughly corresponds to how much data there is on the OS volume.

Note that Veeam's compression is not accounted for in this line of the job log and the total I am getting here is 14.2 GB of data backed up and 8 GB transferred and stored in the repository.

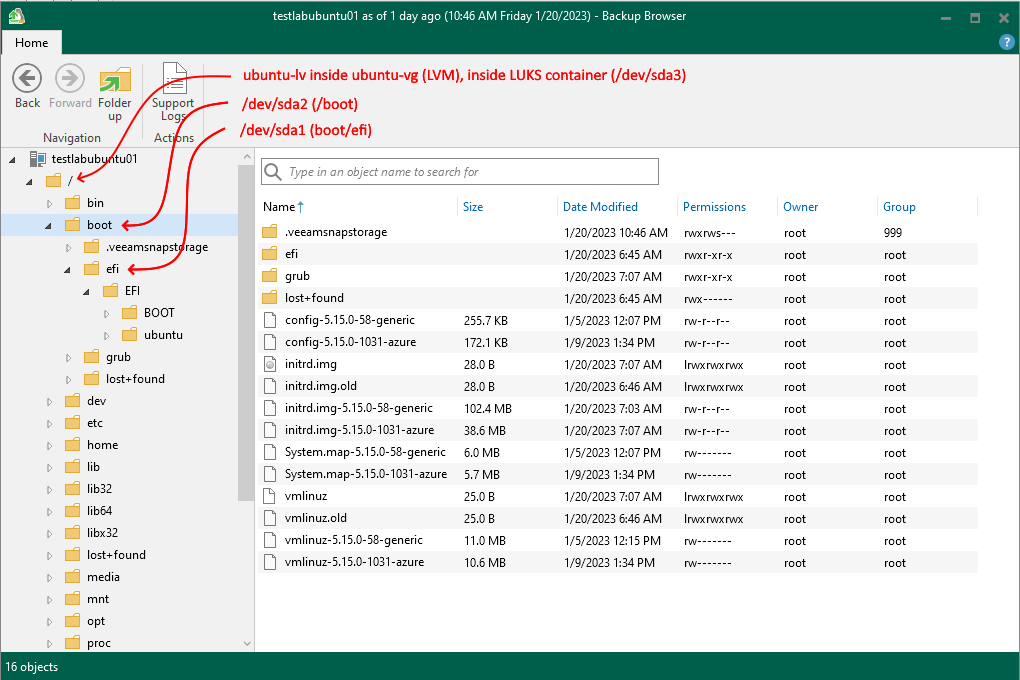
The next check can be done by trying to restore some files via Veeam's Guest File Restore feature. The name is incorrect here. We are a not dealing with a 'guest' (as in VM). We are dealing with a physical server. It will also state 'VM size' in the summary which is, again, not wrong.

It should show the usual Linux (Ubuntu) directory structure. The contents of /dev/sda1 (/boot/EFI) and /dev/sda2 (/boot) is also shown here, it will appear is if it was mounted into the root file system.


In the next part, I will show different options for creating the recovery media.

Thursday, 19 January 2023

1 - Ubuntu with LUKS: Backup and Restore with Veeam Part 1 - Installing Veeam agent for Linux

 First, let's get a few things out of the way.

  • This has nothing to do with virtual machines. This blog is about backing up a physical computer.
  • I'll be using Veeam Backup & Replication 11 (Build 11.0.1.1261) P20220302 and Ubuntu server 22.04.1 LTS. Veeam in this version does not officially support Ubuntu 22.10. This complicates things a little, as you will see, but it works.
  • I will focus on the Linux backup and bare-metal restore part. For all intents and purposes, it does not matter, if you use the standalone Veeam agent for Linux or the full VBR product. It does not matter, if you store the backup locally or on a remote repository. In this blog, I will use Veeam Backup & Replication Community Edition and store the backup in a remote repository.
  • There is some command line (shell) work required, but don't worry. It is mostly copy & paste.
  • You should already know how to work with Veeam in general. I will focus mostly on the parts the pertain to LUKS encryption and bare-metal restore.
  • I will use the server version of Ubuntu but it works the same way with the desktop version.

Part 1 - Installing Veeam agent for Linux


Saving the operating system disk device name in a variable


To find out the device name of the operating system disk, type df -h and look for the device that is the mount point for /boot and /boot/efi.

admin01@testlabubuntu01:~$ df -h  | grep boot
/dev/sda2                          2.0G  183M  1.7G  11% /boot
/dev/sda1                          1.1G  5.3M  1.1G   1% /boot/efi
admin01@testlabubuntu01:~$

In my case, the operating system disk is /dev/sda. Save the device name in a variable.

OSdisk='/dev/sda'

I will keep using this variable in all subsequent parts of this guide.

Understanding the disk layout


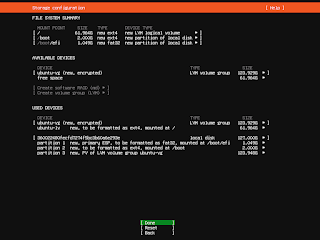
Understanding the disk layout is not strictly required. You may skip this part, if you are in a rush. If you went with the Ubuntu installer's default disk layout but you chose to check the checkbox for creating the LUKS encrypted container, this is what you end up with:

Ubuntu Setup: Encrypt the LVM group with LUKS

Ubuntu setup file system summary


sudo fdisk -l

Device       Start       End   Sectors   Size Type
/dev/sda1     2048   2203647   2201600     1G EFI System
/dev/sda2  2203648   6397951   4194304     2G Linux filesystem
/dev/sda3  6397952 266338270 259940319 123.9G Linux filesystem

admin01@testlabubuntu01:~$ lsblk -f $OSdisk
NAME FSTYPE FSVER LABEL UUID                                   FSAVAIL FSUSE% MOUNTPOINTS
sda
├─sda1
│    vfat   FAT32       A613-036C                                   1G     0% /boot/efi
├─sda2
│    ext4   1.0         4001732b-adc6-42fd-979c-4f7c117a0208      1.6G     9% /boot
└─sda3
     crypto 2           d8073181-5283-44b5-b4dc-6014b2e1a3c2
  └─dm_crypt-0
     LVM2_m LVM2        q0h4Ra-2nCU-G4fx-49uy-bhZ7-T5Og-2xc22Q
    └─ubuntu--vg-ubuntu--lv
       ext4   1.0         88b16848-6e7c-4a7c-ad48-05b9ae344bff       48G    16% /
admin01@testlabubuntu01:~$

In my case, /dev/sda is the operating system disk (and only disk in this computer). 

  • /dev/sda1 is the EFI system partition (ESP) and is mounted as /boot/efi. 
  • /dev/sda2 is the boot partiton and is mounted as /boot.
  • /dev/sda3 is where it's at. This partition is the encrypted LUKS container. Inside the container, there is the LVM with a volume group ubuntu--vg and inside there is a logical volume ubuntu--lv.
  • Also, note there are two mapper devices, dm_crypt-0 and ubuntu--vg-ubuntu--lv. dm_crypt-0 is the LUKS container and ubuntu--vg-ubuntu--lv is the opened LVM volume group which is mounted as /.

df -h
Filesystem                         Size  Used Avail Use% Mounted on
tmpfs                              387M  964K  386M   1% /run
/dev/mapper/ubuntu--vg-ubuntu--lv   61G  9.7G   48G  17% /
tmpfs                              1.9G     0  1.9G   0% /dev/shm
tmpfs                              5.0M     0  5.0M   0% /run/lock
/dev/sda2                          2.0G  1.1G  764M  59% /boot
/dev/sda1                          1.1G  5.3M  1.1G   1% /boot/efi
tmpfs                              387M  4.0K  387M   1% /run/user/1000

ls /dev/mapper/
control  dm_crypt-0  ubuntu--vg-ubuntu--lv

Note that for Ubuntu desktop, you have to check both the LVM and the encryption checkbox, as both are disabled by default if you want to end up with this setup.

Installing Veeam agent for Linux


Issues with installing Veeam agent for Linux on Ubuntu 22.04 or later host


The issue here is that Veeam right now, only supports Ubuntu up to version 21.10 and the agent cannot be installed from VBR console. Ubuntu 22.04 and higher will be supported only when Veeam 12 comes around. This is not because Veeam looks at the version string and refuses to install, it is because Ubuntu 22.04 does a few things differently under the hood, which causes installation to fail.

If you try to add a host running on Ubuntu 22.04 or higher to the VBR infrastructure, Veeam will report that that the OS is unsupported.

Veeam B&R adding Ubuntu 22.10 host to physical infrastructure

You can try to install the agent.

Veeam B&R installing agent on Ubuntu 22.10 host

But it will fail.


One reason for this is that Veeam needs the mlocate package for indexing and Ubuntu has removed this from Ubuntu 22.04.

It can be fixed by manually installing the agent.

Updating the system


Though not strictly required, I recommend you update everything and reboot.

sudo apt update
sudo apt upgrade
sudo apt reboot

From here on, I largely follow the official guide but like I wrote, installation will fail, so you need to change a few things.

Adding Veeam repository

Download the Veeam repository Debian Software Package. Veeam would have you sign up and create an account in order to get this file, but you can simply click on the link and you won't need to be logged in. You can find the latest version here without login. Or you can enter this command:

wget https://repository.veeam.com/backup/linux/agent/dpkg/debian/public/pool/veeam/v/veeam-release-deb/veeam-release-deb_1.0.8_amd64.deb

Add the Veeam repository.

sudo dpkg -i ./veeam-release* && apt-get update

You might get an error like this, but it can be safely ignored.

W: Problem unlinking the file /var/cache/apt/pkgcache.bin - RemoveCaches (13: Permission denied)

W: Problem unlinking the file /var/cache/apt/srcpkgcache.bin - RemoveCaches (13: Permission denied)

Optionally, you can verify that the repository is installed

admin01@testlabubuntu01:~$ grep veeam /etc/apt/sources.list /etc/apt/sources.list.d/*

/etc/apt/sources.list.d/veeam.list:deb [arch=amd64] http://repository.veeam.com/backup/linux/agent/dpkg/debian/public stable veeam

admin01@testlabubuntu01:~$

Update the repository

sudo apt update

Starting the Veeam agent for Linux installation


sudo apt-get install veeam

Note on UEFI Secure Boot: Since you chose LUKS encryption, it means you care to some extent about security, and you should also enable UEFI Secure Boot. Ideally, you do this before installing the agent because Veeam agent for Linux comes with a kernel module for snapshots and if Secure Boot is active, the kernel will be locked down and will not load the Veeam module unless it is signed. To work with Secure Boot, these requirements need to be met. Don't worry, this is taken care of mostly automatically, if Secure Boot is active before you install the agent.
  • A signed (pre) bootloader (shim) is installed
  • You have a Machine Owner Key (MOK) certificate
  • the MOK certificate is installed with shim
  • the Veeam kernel module is signed with the MOK certificate

Machine Owner Key (MOK) certificate enrollment


If Secure Boot is active at the time when the agent is installed and the MOK certificate is not enrolled already, you will be prompted to enroll the MOK certificate. This is a straightforward, mostly automated process. If you did not have Secure Boot active during the installation, but you decide to enable it later, you have to do this manually. See Veeam KB2260 Failed to load module [veeamsnap] as well as Ubuntu Blog: How to sign things for Secure Boot.

During Veeam agent for Linux installation you will see this screen.

Ubuntu Secure Boot MOK certificate enrollment info screen

Choose a password. This password will only be used temporarily, and can be discarded later.

Ubuntu Secure Boot MOK certificate enrollment password screen

Confirm the password.

Ubuntu Secure Boot MOK certificate enrollment password confirmation screen

When you are back on the prompt, the agent installation is finished. However, this does not take care of everything. You may notice, that the MOK certificate is still not enrolled but it is scheduled for enrollment.

mokutil --list-new

Because of this, the kernel module is available but cannot be loaded.

admin01@testlabubuntu01:~$ sudo modprobe veeamsnap
modprobe: ERROR: could not insert 'veeamsnap': Operation not permitted
admin01@testlabubuntu01:~$

Reboot and enroll the certificate.

sudo reboot

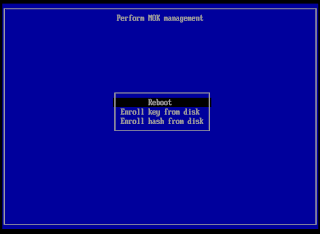
During boot, choose "Enroll MOK".

MOK certificate enrollment MOK management screen

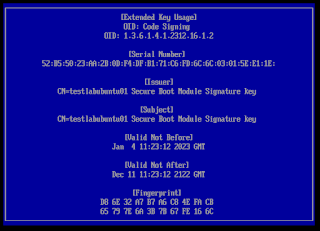
Optionally, you can view the key before you enroll it. It is a self-signed certificate for signing kernel modules (code signing) that Ubuntu generated for you.

MOK certificate enrollment MOK key

Back on the [Enroll MOK] screen (see screenshot above), choose "Continue". Answer "Enroll the key(s)?" with yes.

MOK certificate enrollment confirmation

You may see this screen and may have to select the key (there should only be one key), but I did not get this screen every time during my testing.

MOK certificate enrollment view key

Enter the password that you chose during the installation of Veeam agent for Linux. This password, as I understand it, is needed only for the enrollment of the MOK certificate and is then not needed any longer.

MOK certificate enrollment password

Now choose reboot and boot into Ubuntu as usual.

MOK certificate enrollment reboot

Optionally, you can now confirm that the key is enrolled. 

admin01@testlabubuntu01:~$ mokutil --list-enrolled | grep "Secure Boot Module Signature key"
        Issuer: CN=testlabubuntu01 Secure Boot Module Signature key
        Subject: CN=testlabubuntu01 Secure Boot Module Signature key
        Issuer: CN=testlabubuntu01 Secure Boot Module Signature key
        Subject: CN=testlabubuntu01 Secure Boot Module Signature key
admin01@testlabubuntu01:~$

You can see that this is a self-signed certificate, and that the veeamsnap module can now be loaded.

admin01@testlabubuntu01:~$ sudo modprobe veeamsnap
admin01@testlabubuntu01:~$ lsmod | grep veeamsnap
veeamsnap             200704  0
admin01@testlabubuntu01:~$

But don't forget to unload it because veeamsnap should only be loaded by Veeam while a backup job is running.

sudo rmmod veeamsnap

Optionally, you can now confirm that Veeam agent is installed.

admin01@testlabubuntu01:~$ whereis veeam
veeam: /usr/bin/veeam /usr/lib/veeam /etc/veeam /usr/share/veeam /usr/share/man/man8/veeam.8
admin01@testlabubuntu01:~$ apt list --installed | grep veeam

WARNING: apt does not have a stable CLI interface. Use with caution in scripts.

veeam-release-deb/stable,now 1.0.8 amd64 [installed]
veeam/stable,now 5.0.2.4567 amd64 [installed]
veeamsnap/stable,now 5.0.2.4567 all [installed,automatic]
admin01@testlabubuntu01:~$

Now proceed as you would with Veeam (either by setting up the agent and backup job locally or, in my case, by doing it from Veeam VBR console).

In my case, I have already added the Ubuntu host to a protection group (see above), and now I can rescan the host.

Veeam B&R rescan host

Now, VBR will detect the installed agent.

Veeam B&R protection group agent installed on Ubuntu 22.04

Veeam B&R console physical infrastructure agent installed on Ubuntu 22.04

Veeam B&R console Veeam agent for Linux version

In the next part, I will show how the backup is created.

Wednesday, 14 July 2021

Live-Migrating a Hyper-V VM with TPM on Server Core

As part of our testing environment, we set up a Windows 11 Insider build in a VM and as per requirement, we enabled the virtual Trusted Platform Module (TPM) for that VM. I soon noticed that Cluster Aware Updating (CUA) stopped working on the failover cluster that hosted the VM.


More specifically, it turned out that the node that hosted the VM with the vTPM, could not be drained because the VM role could not be live-migrated to the other node.


Live migration of 'Virtual Machine Insider11' failed.

Virtual machine migration operation for 'Insider11' failed at migration destination 'HYPER-V25'. (Virtual machine ID E567C1C9-B323-4AED-B055-F9DCF98D0853)

The version of the device 'Microsoft Virtual TPM Device' of the virtual machine 'Insider11' is not compatible with device on physical computer 'HYPER-V25'. (Virtual machine ID E567C1C9-B323-4AED-B055-F9DCF98D0853)

The key protector for the virtual machine '' could not be unwrapped. HostGuardianService returned: One or more arguments are invalid (0x80070057) . Details are included in the HostGuardianService-Client event log. (Virtual machine ID )

The vTPM prevented live migration of the virtual machine. The solution lies in exporting the required certificates from the node's certificate store and importing them on the other node.

The issue I ran into with that solution was that on the free Hyper-V Server product, the certificate management console does not exist.


The solution is to do it in PowerShell. The certificates that need to be exported are in the local machine's certificate store in a folder called Shielded VM Local Certificates.

PS C:\> dir "cert:\LocalMachine\Shielded VM Local Certificates"


   PSParentPath: Microsoft.PowerShell.Security\Certificate::LocalMachine\Shielded VM Local Certificates

Thumbprint                                Subject
----------                                -------
A068364B6618C532067D93B3752ABEA4C86CF50D  CN=Shielded VM Encryption Certificate (UntrustedGuardian) (Hyper-V24)
883480C7627A4D63EC3E56E4F9A82A9F1EB1C4EB  CN=Shielded VM Signing Certificate (UntrustedGuardian) (Hyper-V24)


PS C:\>

I stored the certificates in a variable

PS C:\> $cert1 = Get-ChildItem -Path "cert:\LocalMachine\Shielded VM Local Certificates\A068364B6618C532067D93B3752ABEA4C86CF50D"
PS C:\> $cert2 = Get-ChildItem -Path "cert:\LocalMachine\Shielded VM Local Certificates\883480C7627A4D63EC3E56E4F9A82A9F1EB1C4EB"
PS C:\>

Next, I chose a password for the .pfx file,

PS C:\> $mypwd = ConvertTo-SecureString -String "1234" -Force -AsPlainText
PS C:\> 

 exported the first certificate and repeated the process for the second certificate.

PS C:\> $cert1 | Export-PfxCertificate -FilePath C:\cert1.pfx -Password $mypwd

    Directory: C:\

Mode                LastWriteTime         Length Name
----                -------------         ------ ----
-a----        7/14/2021   4:37 PM           2599 cert1.pfx

PS C:\>

Instead of using a password, I could protect the file by using -ProtectTo instead and set a User or group that is allowed to access the private key but I will not cover this possibility here.

Of course I could do this in one step by piping the output from Get-ChildItem into Export-PfxCertificate.

PS C:\> Get-ChildItem -Path "cert:\LocalMachine\Shielded VM Local Certificates\A068364B6618C532067D93B3752ABEA4C86CF50D" | Export-PfxCertificate -FilePath C:\cert1.pfx -Password $mypwd

    Directory: C:\

Mode                LastWriteTime         Length Name
----                -------------         ------ ----
-a----        7/14/2021   4:43 PM           2599 cert1.pfx

PS C:\>

The certificates were now exported as .pfx files on my c: drive and were moved to the other node.

PS C:\> dir c:\ *.pfx

    Directory: C:\

Mode                LastWriteTime         Length Name
----                -------------         ------ ----
-a----        7/14/2021   4:37 PM           2599 cert1.pfx
-a----        7/14/2021   4:37 PM           2599 cert2.pfx

PS C:\> 

On the other node, that is, on all nodes the VM potentially needs to be live-migrated to, I imported the certificate. This also needed to be done in PS as the certificate MMC was missing. The folder Shielded VM Local Certificates was also missing.

PS C:\> dir "cert:\LocalMachine\Shielded VM Local Certificates"
dir : Cannot find path '\LocalMachine\Shielded VM Local Certificates' because it does not exist.
At line:1 char:1
+ dir "cert:\LocalMachine\Shielded VM Local Certificates"
+ ~~~~~~~~~~~~~~~~~~~~~~~~~~~~~~~~~~~~~~~~~~~~~~~~~~~~~~~
    + CategoryInfo          : ObjectNotFound: (\LocalMachine\S...al Certificates:String) [Get-ChildItem], ItemNotFound
   Exception
    + FullyQualifiedErrorId : PathNotFound,Microsoft.PowerShell.Commands.GetChildItemCommand
PS C:\>

The folder did not exist, presumably because there never were any VMs with vTPM on that node. I needed to create the folder first.

PS C:\> mkdir "cert:\LocalMachine\Shielded VM Local Certificates"

Name : Shielded VM Local Certificates


PS C:\>

I was able to confirm that the folder existed and was empty.

PS C:\> dir "cert:\LocalMachine\Shielded VM Local Certificates" 
PS C:\> 

It was time to import the certificates from the other node. I needed the password that I had set before.

PS C:\> $mypwd = ConvertTo-SecureString -String "1234" -Force -AsPlainText
PS C:\> 

The import once again needed to be done for both certificates.

PS C:\> Import-PfxCertificate -FilePath D:\temp\cert1.pfx -CertStoreLocation "cert:\LocalMachine\Shielded VM Local Certificates" -Password $mypwd -Exportable


   PSParentPath: Microsoft.PowerShell.Security\Certificate::LocalMachine\Shielded VM Local Certificates

Thumbprint                                Subject
----------                                -------
A068364B6618C532067D93B3752ABEA4C86CF50D  CN=Shielded VM Encryption Certificate (UntrustedGuardian) (Hyper-V24)


PS C:\>

Note, that I chose to make the private key exportable by using the argument "-Exportable". This is not a requirement however.

Both certificates were imported. Note that the subject name contains the hostname of the node that hosts the VM with TPM

PS C:\> dir "cert:\LocalMachine\Shielded VM Local Certificates"

   PSParentPath: Microsoft.PowerShell.Security\Certificate::LocalMachine\Shielded VM Local Certificates
Thumbprint                                Subject
----------                                -------
A068364B6618C532067D93B3752ABEA4C86CF50D  CN=Shielded VM Encryption Certificate (UntrustedGuardian) (Hyper-V24)
883480C7627A4D63EC3E56E4F9A82A9F1EB1C4EB  CN=Shielded VM Signing Certificate (UntrustedGuardian) (Hyper-V24)

PS C:\> 

 That was it. The VM could now be live-migrated to the other node.

Sources:
Can I create a new folder/directory under Windows Certificates and import all my self signed CA certificates in it - Stack Overflow
How to manage certificate private keys on server 2016 Core : sysadmin (reddit.com)
Export-PfxCertificate (pki) | Microsoft Docs
Import-PfxCertificate (pki) | Microsoft Docs