I previous parts, I showed how to use Veeam to back up Ubuntu that is installed inside a LUKS container. I also showed how to prepare for bare-metal restore. In this part, I will show how to restore the backup to bare-metal.
The challenge here is that Veeam does not back up, nor restore LUKS containers but I previously showed how to back up the contents of the LUKS container, and therefore you would be right to assume that it should be fine if you can manually re-create the LUKS container. But first things first. You should now have the following things ready.
- backup
- hardware that the backup will be restored to
- recovery media
- you have knowledge of the
- operating system disk physical properties
- partition layout
- file system sector/block sizes
- LUKS container properties
But I did not do the steps described in previous parts while I was still able to access my Ubuntu computer and now, I cannot access the Ubuntu installation anymore! What can I do?
If you followed my guide, you should have all of the things mentioned above, but if you just have the backup and the hardware but nothing else, it should be fine. What you don't have is
- Veeam Recovery media
Go back to the previous part and create a recovery media. You will find the information on how to download a Veeam generic recovery media or how to create your own Ubuntu live based recovery media. - Information on disk sector size, partition table and LUKS container, etc.
Not in this part, but in the next part, you will be using some of the information collected previously. If you don't have that, look out for some additional information that I have added to the guide.
Booting into the recovery media
You can use the custom Veeam recovery media you have created, the downloaded generic recovery media, or the Ubuntu live based media. The instructions from here on will work for all types of recovery media.
If you boot into the Veeam recovery media (generic or custom), you can choose between doing the restore locally or via SSH.
In this case, I will use an Ubuntu live based recovery media,
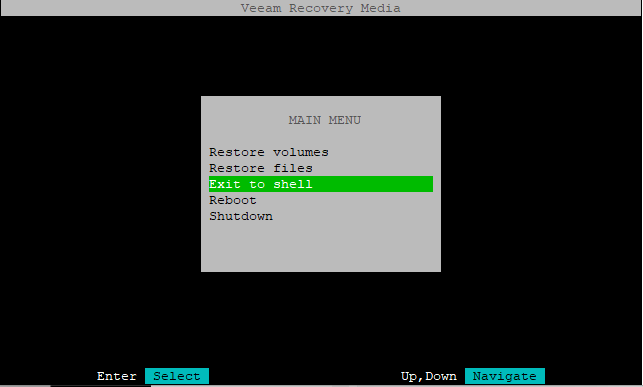
Since this is bare-metal recovery, you should now exit to shell and confirm that the disk does not contain any partitions.
Save the device name of your operating system disk in a variable. To find out the device name of the operating system disk, see part 1. In my case, the operating system disk is /dev/sda.
OSdisk='/dev/sda'
Preparing the disk
Optionally, you can look at the operating system disk's partition table to confirm that the disk is empty.
sudo gdisk -l ${OSdisk}
In this case, there is already a partition on the disk, but not the kind of partition that would be useful during restore.
ubuntu@ubuntu:~$ sudo gdisk -l ${OSdisk}
...
Partition table scan:
MBR: protective
BSD: not present
APM: not present
GPT: present
...
Found valid GPT with protective MBR; using GPT.
...
Number Start (sector) End (sector) Size Code Name
1 2048 266336255 127.0 GiB 4200 Windows LDM data
ubuntu@ubuntu:~$
You can wipe the partiton table.
ubuntu@ubuntu:~$ sudo wipefs --all ${OSdisk}
/dev/sda: 8 bytes were erased at offset 0x00000200 (gpt): 45 46 49 20 50 41 52 54
/dev/sda: 8 bytes were erased at offset 0x1fbffffe00 (gpt): 45 46 49 20 50 41 52 54
/dev/sda: 2 bytes were erased at offset 0x000001fe (PMBR): 55 aa
/dev/sda: calling ioctl to re-read partition table: Success
ubuntu@ubuntu:~$
And confirm that disk shows as empty.
ubuntu@ubuntu:~$ sudo gdisk -l ${OSdisk}
...
Partition table scan:
MBR: not present
BSD: not present
APM: not present
GPT: not present
...
Number Start (sector) End (sector) Size Code Name
ubuntu@ubuntu:~$
Accessing the backup
Now it is time to return to Veeam recovery UI. On Ubuntu live based recovery media, enter
sudo veeamconfig recoveryui
On generic or custom Veeam recovery media, enter
sudo veeam
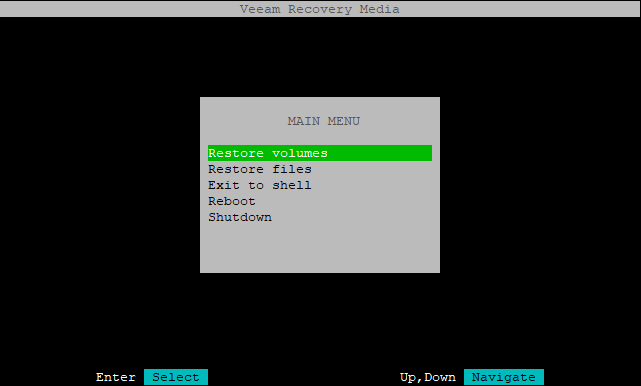
Choose 'Restore volumes'
Locate the backup. In my case, I will connect to a VBR server.
You should now see what it is the backup.
Restoring GPT partition table, EFI system partition (ESP) and /boot partition
Note that the GPT table is not technically restored, rather, a new partition table is created.
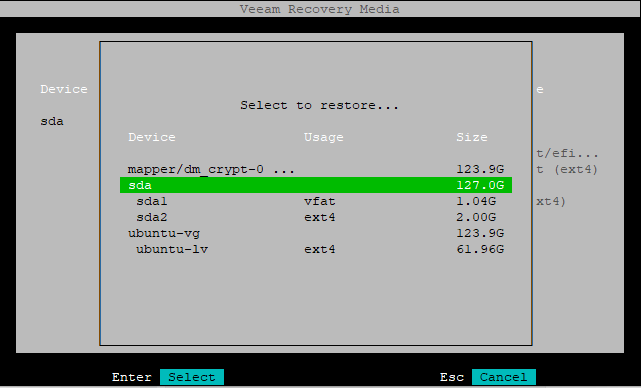
On the left column (current system), select your operating system disk (here sda) and choose 'Restore from'.
Here, in 'Select to restore' choose sda (or whatever it is on your system).
You have mapped the current disk to the disk from the backup. It should look like this.
CURRENT SYSTEM │ IN BACKUP
│
Device Restore Size │ Device Size Usage
│
sda 127.0G │ mapper/dm... 123.9G
sda1 sda1 (/bo... 1.04G │ sda 127.0G
sda2 sda2 (/boot) 2.00G │ sda1 1.04G /boot/efi...
free 123.9G │ sda2 2.00G /boot (ext4)
│ ubuntu-vg 123.9G
│ ubuntu-lv 61.96G / (ext4)
Proceed with the restore. At this point you are probably wondering why you can't proceed in the UI to restore the third partition, (here it would be: /dev/sda3), then create a new LUKS container, create a new LVM and then map ubuntu-lv into that LVM. You could, but there is a problem with doing it that way. I will get to that later.
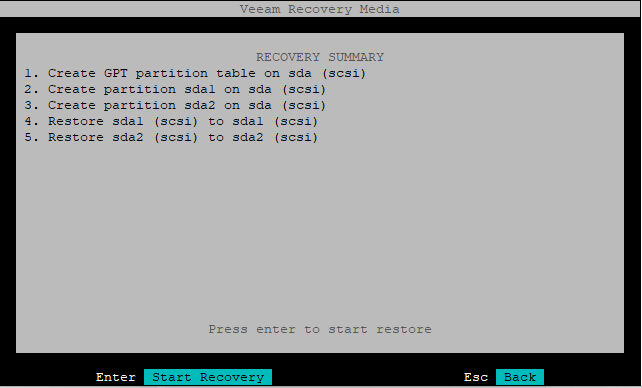
RECOVERY SUMMARY
1. Create GPT partition table on sda (scsi)
2. Create partition sda1 on sda (scsi)
3. Create partition sda2 on sda (scsi)
4. Restore sda1 (scsi) to sda1 (scsi)
5. Restore sda2 (scsi) to sda2 (scsi)
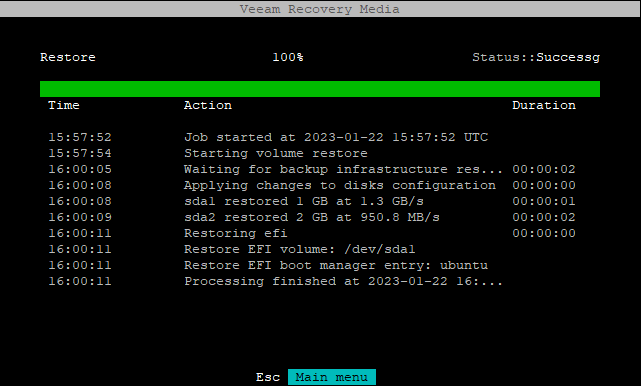
The result should look like this.
Restore 100% Status::Successg
Time Action Duration
15:57:52 Job started at 2023-01-22 15:57:52 UTC
15:57:54 Starting volume restore
16:00:05 Waiting for backup infrastructure res... 00:00:02
16:00:08 Applying changes to disks configuration 00:00:00
16:00:08 sda1 restored 1 GB at 1.3 GB/s 00:00:01
16:00:09 sda2 restored 2 GB at 950.8 MB/s 00:00:02
16:00:11 Restoring efi 00:00:00
16:00:11 Restore EFI volume: /dev/sda1
16:00:11 Restore EFI boot manager entry: ubuntu
16:00:11 Processing finished at 2023-01-22 16:...
Do not reboot yet.
Confirming that this worked
Exit to shell
Optionally, confirm that /dev/sda1, /dev/sda2 have been restored and that the GPT table is present.
ubuntu@ubuntu:~$ sudo gdisk -l ${OSdisk}
...
Partition table scan:
MBR: protective
BSD: not present
APM: not present
GPT: present
...
Number Start (sector) End (sector) Size Code Name
1 2048 2203647 1.0 GiB EF00
2 2203648 6397951 2.0 GiB 8300
ubuntu@ubuntu:~$
Optionally, confirm that the pre-bootloader (shim) is registered with the UEFI firmware.
ubuntu@ubuntu:~$ sudo efibootmgr --verbose
BootCurrent: 0001
Timeout: 1 seconds
BootOrder: 0001
Boot0001* ubuntu HD(1,GPT,1f6fb137-bbf6-4282-8a83-fe4de68dee96,0x800,0x219800)/File(\EFI\ubuntu\shimx64.efi)
ubuntu@ubuntu:~$
Remain on the shell, do not reboot. In the next part, I will show how to restore the root file system, including all the bells and whistles (LVM, LUKS).


No comments:
Post a Comment